
10 Man
Possible Raid: Lava Crab Yogg-Saron shots.
After some discussion with other raiding guilds I think I have a better idea about how the strat needs to work.
Fill-in for Zildo may available in the form of Garreth.
However, OTHER HEALERS WILL NOT BE TURNED AWAY IF HE CAN'T MAKE IT.
If we can do it, let's do it. I'd hate to let this opportunity slip!

13 - Yogg-Saron Strategy Guide
saedo — Fri, 04/24/2009 - 14:30
 Health:
- Heroic: 55M
- Normal: 11M
Keepers:
- Each keeper we ask for help will give us buffs for this fight. The hard mode is not asking for em.
- Freya - Resiliance of Nature: Increases all damage done by 10% and healing received from all sources by 20%.
- Freya - Sanity Well: Standing in the well brings you back to your senses, regenerating 20% Sanity every 2 sec. Damage done is reduced by 50% while you remain in the well. Instant Two of these green beams will be up the entire fight at the sides of the room.
- Mimiron - Speed of Invention: Increases all damage done by 10% and movement speed by 20%.
- Mimiron - Destabilization Matrix: Channels a beam of titan energy that destabalizes the molecular structure of certain Saronite based creatures, reducing attack speed by 100% and casting speed by 300%. Cast on all mobs in the encounter.
- Hodir - Fortitude of Frost: Increases damage done by 10% and reduces damage taken from all sources by 20%.
- Hodir - Hodir's Protective Gaze: Allows Hodir to save a friendly target who sustains fatal damage by encasing them in a nearly impenetrable block of ice for 10 seconds. Hodir must rest after performing this action.
- Thorim - Fury of the Storm: Increases all damage done by 10% and total health by 20%.
- Thorim - Titanic Storm: Channels a storm of titan energy that periodically strikes at enemy targets with bolts of lightning strong enough to destroy weakened immortal creatures. Without Thorim the Immortal Guardians in phase 3 are unkillable.
The Fight:
First thing to mention is this:
Sanity: Indicates your overall level of Sanity. If Sanity reaches zero your mind will be permanently under the control of Yogg-Saron. 20 yd range, Instant
Insane: Yogg-Saron takes control of the target's mind. Damage is increased by 100% and health is increased by 300% for 1 min. The target dies horribly when this effect is removed.
We start at 100%. Various attacks will reduce this. When you hit zero, you are perma-MC'd and will see the raid as Faceless Ones. You will die on your own in a min, or be killed by the raid. You cannot be battle rez'd. Well, you can, but your sanity will still remain zero so you'd just get MC'd again. So losing it is basically perma-death for you.
Freya's beams can help restore it when not on Hard Mode. Anyways, on to the phases.
Phase 1: Sara
We're dealing with Sara and adds. Sara herself is unkillable, by us directly. A gimmick is employed though.
Sara:
- Sara's Fervor: Increases a friendly target's damage by 20%, but also increases damage taken by the target by 100%. Lasts 15 sec
- Sara's Blessing: Heals a friendly target for 27000 to 33000, but causes 60000 Shadow damage over 20 sec
- Sara's Anger: Inflicts 12500 Shadow damage every 3 sec, but increases Physical damage done by 12000. Lasts 12 sec
As you can see, she still does buff targets during this phase, but basically each of her buffs also fuck with them. Do more damage, take more damage. Heal you, then fuck you over with a dot. Give you a dot, but let you do more damage.
Anyways, there are adds that spawn. They come at a relatively slow pace, which increases over time. There's also a gas cloud to avoid, being in them will spawn more adds.
Guardian of Yogg-Saron:
- Shadow Nova: Inflicts 25,000 shadow damage to any targets nearby when the Guardian of Yogg-Saron dies (including Sara).
- Dark Volley: Inflicts 8500 to 11000 shadow damage to the entire raid. Reduces healing effects by 25%. Lasts 10 seconds. (interruptable)
- Dominate Mind: Dominates the mind of the target, temporarily placing them under Yogg-Saron's control. Also reduces Sanity by 4%
As you can see, the way to deal with Phase 1 is to have Guardians die near Sara. We need total of 8 to kill her off, to end phase 1. Goal is to kite Guardians away from clouds, though we can use them to quicken the spawn pace. And to kill them near Sara only.
Phase 2: Brain of Yogg-Saron
This is where we force Yogg-Saron to appear and similar to C'Thun, we can't really hurt him, and have to deal with tentacles. Finish off any Guardians. Meanwhile:
- Dominate Mind: Dominates the mind of the target, temporarily placing them under Yogg-Saron's control. Also reduces Sanity by 4%. 50000 yd range, Instant
- Psychosis: Inflicts 7500 Shadow damage. Also reduces Sanity by 9%.
- Brain Link: Links the brains of two enemy targets. Afflicted targets suffer 3000 Shadow damage and lose 2% Sanity every 1 sec. whenever they are more than 20 yards apart. 50000 yd range, 1.5 sec cast
- Malady of the Mind: Inflicts 5000 Shadow damage and causes the enemy target to run in horror for 4 sec, then attempts to jump to another enemy within 10 yds. Also reduces Sanity by 3%. 1.5 sec cast
- Death Ray: Blasts the target with a stream of deadly energy, dealing 20000 Nature damage every 0 sec (Instant death).
So this phase is Tentacle phase. While dealing with them the few things of Yogg's to be aware of. Brain Link'd people must get close to each other, think of Mother Shahraz, now do the opposite! Also, it seems you must spread out or risk chaining a fear. Lasers to avoid.
Anyways, the Tentacles:
Crusher Tentacle: Melees hard, has a ton of HP and has an aura that reduces damage done by the raid by 20%, stacks with other crusher tentacles so these must go down fast. Melee-ing these will interrupt their aura but they gain a temporary buff that increases their damage and attack speed when they are hit so this is dangerous if they are being DPS'd.
Corruptor Tentacle: Casts various debuffs. Dispellers will need to be on the ball. These are interruptable.
- Curse of Doom: Dooms the target, inflicting 20000 Shadow damage after 12 sec. Curse dispellable.
- Apathy: Reduces the attack and casting speeds of an enemy target by 60% and slows its movement by 60%. Lasts 20 sec. Magic dispellable.
- Black Plague: Infects an enemy target with the plague, causing it to periodically retch uncontrollably and be stunned for 2 seconds. Lasts 24 seconds. Disease dispellable.
- Draining Poison: 3500 Nature damage inflicted every 3 sec. 1400 Mana drained every 3 sec. Lasts 18 seconds. Poison dispellable.
Constrictor Tentacle: These have very little HP and appear underneath random players, grab them and hoist them into the air doing damage every few seconds until killed. You are still able to attack / cast heals while in it.
Every 90 seconds or so Portals will open into Yogg-Saron's mind. This also starts a timer.
Induce Madness: Drives all nearby targets insane, reducing Sanity by 100%. 60 sec cast
The melee dps must take the portals and complete their task (or just get out) within 60 seconds or they'll become Insane. Also, don't go if your sanity is low, else you won't last long in there without going insane.
There will be a random 3 illusion rooms with tentacles and skulls around. The skulls cast:
Lunatic Gaze: Looking into the maw of madness unhinges your mind, inflicting 5700 to 6300 Shadow damage and reducing Sanity by 4% every 1 sec. for as long as you are facing the caster. Instant
So do not face them, it'll be a purple beam at you if you are. Must move and strafe around with backs to the skull at all times, while killing tentacles. Kill them all and the illusion is shattered. Run into the brain room and attack it as much as possible before the 60 seconds is over. Else you'd go insane.
Illusions:
- Wyrmrest Temple - You'll be at the bottom of it, the room with the Chamber of Aspects. In front, you'll see the story of the Demon Soul's creation. You'll see various colored dragons around the perimeter of the room, those are attackable and your targets. They'll turn into tentacles upon attack. There are also skulls near by so you must strafe around avoiding facing em.
- Arthas - You'll see him torturing a prisoner, a champion supposedly. Anyways, this one the skulls are mostly center room, with occasional ones behind pillars. Your targets are the worshippers I believe, they are in several packs of 3.
- Stormwind - The Stormind King's assination is going to take place. Your targets are the Suits of Armor around the room. Their backs are right agains the walls, and the Skulls are kinda in the alcoves.
And that's the "stomach" version of Yogg-Saron. Getting Yogg-Saron ('s brain) to 30% ends phase 2.
Phase 3: Body of Yogg-Saron
Health:
- Heroic: 16M
- Normal: 3M
- Enrage: 5 mins
This becomes a straight dps burn down. But also dealing with Sara's abilities, and he has Lunatic Gaze (4 sec duration every so often) so don't face him during that.
Faceless Immortal Guardians will start spawning, tank those. So long as we can have enough dps to beat the enrage timer, and have Thorim helping, we can dps down the Guardians and Thorim will kill them. Otherwise it's a race to kill him before they kill us. They also do a Drain Life that can be interrupted.
Another thing of note is that Yogg-Saron can cast Empowering Shadows now to heal the Guardians. It's a slow cast, so can weaken the guardians quickly to be killed off by Thorim before it goes off.
Heroism go!
Hard Mode:
So each of the keepers give the raid buffs, and using 1 or less is Hard Mode. Thorim would be the one to use to allow the Guardians in the last phase to be killed.
This means, without Hodir, raid takes 20% more damage, and you don't get ice blocks to save your raid from potential deaths. Play with caution to try to mitigate whatever you can.
Without Mimiron, raid will move 20% slower, things attack 100% faster, and cast 300% faster. This means, running around Brain room is slower, must be done fast and efficiently. Tanks will take more damage. Casts will be harder to interrupt, the shadow volley is 1.5s vs 4.5s, and the Corruptors are 2s instead of 6s casts.
Without Freya, well this is the slightly harder part. Psychosis will randomly pepper the raid with 9% sanity loss. Guess that's just RNG. Brain Links are another cause, raid should almost always group up so you're not linked across the room to rape your sanity. But still spread a little bit to not chain Malady of the Mind around other people. The Brain room crew, have to be doubly aware of where the Lunatic Skulls are. Yes, they will start nuking you even before they're drawn in, will have to rely on memory to turn ASAP as soon as you see which room you're in.
Otherwise, the fight is exactly the same, well we also all do 30% less damage than normal, so pick it up.
In the final phase, stare at the Lunatic Gaze timer. There's a CD on it, so switch back and forth between guardians and Yogg, pretty much every 6 seconds. You don't want to lose what little sanity you probably have left. Take it nice and slow and do a lot of turning while getting what dps you can on Yogg.
This fight is quite execution based, and you don't even have to be perfect to do it. Just stick it through, and calmly burn everything down.
Achievements:
Kiss and Make Up - /Kiss Sara in Ulduar while she is angry with you on Normal/Heroic Difficulty.
This is just kissing Sara when Phase 2 starts. Macro it.
Drive Me Crazy: Defeat Yogg-Saron without any raid member going insane on Normal/Heroic Difficulty.
Raid check. Use the Sanity Wells. In a good kill, you should get this one easily.
He's Not Getting Any Older - Defeat Yogg-Saron within 7 minutes on Normal/Heroic Difficulty.
Time/dps check. Possibly drop a healer, or dps just not take as much damage thing.
They're Coming Out of the Walls - Defeat 9 Guardians of Yogg-Saron within 12 seconds on Normal/Heroic Difficulty.
This sounds like it doesn't need a kill, just a fluff achievement. So take an attempt, gather 12, aoe them down. Wipe (probably), then kill Yogg.
In His House He Waits Dreaming - Experience all 3 visions of Yogg-Saron's mind on Normal/Heroic Difficulty
Last I did this, it was bugged, but in a good way, did not need King Llane's vision, got the thing just seeing the other 2. But this is progressive so don't need all 3 in one kill shot. Get in and you'll randomly see em all eventually.
Three Lights in the Darkness - Defeat Yogg-Saron with the assistance of three or fewer Keepers on Normal/Heroic Difficulty.
Two Lights in the Darkness - Defeat Yogg-Saron with the assistance of two or fewer Keepers on Normal/Heroic Difficulty.
One Light in the Darkness - Defeat Yogg-Saron with the assistance of one or fewer Keepers on Normal/Heroic Difficulty.
This is Hard Mode.
Alone in the Darkness - Defeat Yogg-Saron without the assistance of any Keepers on Normal/Heroic Difficulty
This is the mode that drops the Mimiron head mount.
Sources:
- http://www.mmo-champion.com/index.php?page=851
- http://www.wowwiki.com/Yogg-Saron_(tactics)
Raid: Lava Crab has Mimiron, Vezax, and Yogg-Saron left to kill.
We are raiding this Saturday at approx. 6pm, possibly sooner if our regular raiders can attend.
We may have spots open for dps so if you are interested, be on and cross your fingers. I can't guarantee an invite but I may reimburse you for your time.
Expected attendees:
Deadhli
Nuitarin
Karvinen
Moriella
Zildo
Disrupta
Hbk
Luminaire
Quisjaa
Saedo

"Watch Your Feet!" Thorim strategy
Shihli — Wed, 04/22/2009 - 23:16
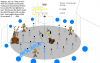
What I mean when I say "Watch your feet!"
12 - General Vezax Strategy Guide
saedo — Wed, 04/22/2009 - 15:22
 Health:
- Heroic: 30M
- Normal: 8M
Abilities:
- Aura of Despair: Prevents mana regeneration from nearly all natural sources. Aspect of the Viper, Judgements of the Wise, Shamanistic Rage, and Spiritual Attunement remain at least partially effective. Also reduces melee attack speed by 20%
- Mark of the Faceless: Inflicts an ancient malediction on a target, siphoning 5000 health every 1 sec. from enemies near the target, for 10 sec. 100 yd range
- Shadow Crash: Fires a shadow missile at a target, dealing 11310 to 12690 Shadow damage to all enemies near the impact point and knocking them away. After impact, leaves an energy field that lingers for 20 sec, increasing magical damage dealt by 100%, increasing casting speed by 100%, reducing healing done by 75%, and reducing mana costs by 70%. 50000 yd range, Instant
- Searing Flames: Deals 13875 to 16125 Fire damage to all enemies within 100 yards, superheating their armor and reducing its ability to protect them by 75% for 10 sec. 2 sec cast (interruptable)
- Surge of Darkness: Empowers the caster with dark might, increasing physical damage by 100% but reducing movement speed by 55%, for 10 sec. 3 sec cast
Saronite Crystals:
- These spawn and fly around the room. Should we choose to kill em (we will for ez mode), they drop a:
- Saronite Vapors: Converts life force into pure mana energy. Instant (it stacks as you sit in it)
Saronite Animuls:
- After the 8th Saronite Crystal, this guy will spawn
- Heroic 8M hp
- While this guy is up, Vezax is invulnerable, but still interruptable.
- Profound Darkness: Inflicts 500 damage to all enemies, and increases Shadow damage taken by 10% per application. Instant (stacks to 20)
The Fight:
There is little to no mana regeneration in this fight except from that single potion, and the Saronite Vapors. Reduced effects from your talents, like Viper, Wise, etc.
Healer rotations must be set up.
He does a Mark of the Faceless buff randomly, it's the new "bomb" except all the damage you do will heal Vezax, so stay away from everyone if you have it. It'll do 50K of healing per second of everyone you hit.
He does Shadow Crash, which launches a missile, we've all seen this before. Like Old Kingdom, or Mimiron's rockets as we'll get to know. Don't stand in those. What's different is that it leaves behind an energy field that buffs us, for the most part. Casters and Hunters can take advantage of this. So we should be trained by Hodir to do this, avoid shit that falls, then stand in shit after it spawns the good stuff after it falls.
He does Searing Flame, that is interruptable. Do that.
Surge of Darkness, this is where we gotta just stay away from him, and have the tank kite him. Remember aggro! So careful on dps while tank is kiting. Think of it a bit like Anub's Locust Swarm. Kite!
There are crystals that fly around, we kill em for ezmode. They drop a gas cloud that restores mana while taking that exact amount from health. It stacks, and stacks up pretty fast, so don't sit in them too long. A good time to do this is during kite phases. Set up our rotation to who gets in first for mana, and have some aoe healers take care of them.
Kill it, kill him, collect loots.
Hard Mode
Don't attack crystals, don't kite Vezax either. Use CDs (if neccessary) to survive the Surge. In fact, it's probably best to save the best ones for when the Animus appears as that's when big damage occcurs.
Have at minimum 3 people in ranged spot (in 10 mans). The Shadow Crashes and Marks will only target ranged if that is the case. So if you got enough ranged, the healers can hang out in melee range to avoid them. Goal is to not get hit with Shadow Crash. You can either do this via spreading out and everyone on their own, and have to watch for it. Or group up entirely, and move as a singular group.
Note: Resto druids can melee boss to get clear casting procs for their hax healing.
You have 4 mins before the 8th crystal spawns, and the Animus appears. Goal is to have Vezax down to 20% ish by then. Switch to the Animus, Vezax no longer casts the fire thing (in 10 man at least). Now here's where boss mods can bug out and stop broadcasting Shadow Crashes. The ranged have to be well aware of this and watch shadow crashes. With the Animus' debuff, they can start one shotting you. Also, have Shadow Protection Pots ready for use.
After burning down the Animus, it's the home stretch. Finish off Vezax, remember to kick again, and hard mode is yours.
Achievements:
Shadowdodger - Defeat General Vezax without any raid member being hit by Shadow Crash on Normal/Heroic Difficulty.
Just a raid check, avoid it.
I Love the Smell of Saronite in the Morning - Defeat General Vezax after defeating the Saronite Animus on Normal/Heroic Difficulty.
This be hard mode. Don't kill crystals, after the 8th, this guy spawns. Kill him then Vezax I suppose.
Trash Info:
Twilight Packs: These are a group of humanoids (mostly) of various classes that are CC'able and stuff. Priest heals and fears. Rogue runs around killing and fan of knives and deadly poison. Fire and Frost mages do their respective spells. Arms warrior bladestorms. Prot warrior concussion blows. Elemental Shaman with Fire Elemental doing their thing. They don't all necessarily show up in the same pack, it's like a random 5 of those and can wind up with 2 of each. So, if you have some CC, go for it. Tank the rest, burn down the Priest and do it well away from anything else to not get feared.
Faceless Dudes: There are a few of these on the way. They do the Shadow Crash, don't stand in them. They also mana burn, don't be near him. Every 25%, it spawns a Voidwalker which makes him immune to damage. Kill that, which makes him explode with a knockback, so don't be knocked into other trash. Then go back to the Faceless One, repeat.
Videos:
10 man Hard Mode (w/ Shadowdodger)
Sources:
- http://www.mmo-champion.com/index.php?page=849
- http://www.wowwiki.com/General_Vezax
Raid: AFK is going back to Naxx this week. Lets get a good clean run and get a full clear on Friday. Here is the line up I am expecting. If you can't make it please post here or let myself or Jayel know.
Tank 1: Holynightmar
Tank2: Joshsmom
Heal1: Jayel
Heal2: Saja
DPS1/Heal3: Atar
DPS2: Sarricon
DPS3: Heavenleighh
DPS4: Vepis
DPS5: Eluda
DPS6: Chalaina
We may need another DPS this week so sign up if you are interested.
We run Saturday evenings. Invites start at 5pm Server, and we go until people pass out at their keyboards!!!!
Loot rules are simple...you want it...roll need (main spec, dual spec, off spec). You aren't sure or iffy...roll greed. (All alts roll greed)
Line up:
2 Tanks
Ananaras (Tank/DPS) - Out - Replacement Needed
Pulgaburrito (Tank/DPS) - Should be here, if not, Xendu to OT
3 Healers
Heavenleigh (Resto/Chicken) - Confirmed
Vulk (Holy/Ret) - Possibly Out (Jayel or Morgyn to heal)
Atak (Resto)- Confirmed
5 DPS
Zaiyah (Raid Ele/PvP Ele) - Confirmed
Grasen (DPS/PvP) - Confirmed
Serephdragon (Ret/PvP Ret) - Confirmed
Rhoora (Enh) - Confirmed
Jayel (Prot/Holy) - Confirmed
08 - Hodir Strategy Guide
saedo — Sat, 04/18/2009 - 15:26
 Health:
- Heroic: 32M
- Normal: 8.4M
- 8 minute enrage
Abilities:
- Biting Cold: Deals increasing periodic damage to stationary enemies. Movement diminishes this effect. This aura uses the same mechanics as Intense Cold during the fight against Keristrasza in the Nexus, it stacks up and damage increases over time. Moving or staying near a Toasty Fire will lower the amount of stack.
- Flash Freeze: Encases the target in a block of ice. This spell will freeze the entire raid in blocks of ice, you can avoid this spell by standing on Sspawned by Icicle. 9 sec cast, 30 sec cooldown
- Freeze: Inflicts 5550 to 6450 Frost damage to nearby enemies, immobilizing them for up to 10 sec. 10 yd radius. The root effect of this spell is dispellable.
- Icicle: Icicles will randomly drop on the ground during the fight. Move before they hit the ground, they will deal 12,000 damage on impact. After an Icicle crashed on the ground it will create a Snowdrift, standing on it will protect you from the effects of Flash Freeze.
- Frozen Blows- Reduces Hodir's physical damage by 70%, but grants each of his attacks 31,062 (Heroic: 40,000) additional Frost damage, for 20 seconds. Enemies take 4,000 additional Frost damage every 2 seconds for the duration of the spell.
NPCs:
There will be 8 friendly (4 in normal) NPCs that we can release to help with the fight. They start off in ice blocks to attack to release. Not absolutely neccessarly, but they do dps themselves and buffs, and help dispels too. Also don't release them before Hodir is pulled or they despawn for the fight.
Moonkins:
- Starlight: Envelops a location in starlight for 1 min, increasing the attack and casting speed of friendly units within it
Shamans:
- Storm Power: Charges a nearby friendly target with lightning, increasing critical strike damage by 135% for 30 sec.
Priests:
- Dispel: Dispell Priests will randomly dispell Freeze on the members of the raid.
Mages:
- Toasty Fire: Warms nearby friendly creatures, preventing the effects of Freeze and Biting Cold, and increasing Spirit by 4. In addition, your Spells and Ranged attacks have a chance to singe enemies. Toasty fire can be extinguished by falling ice or Flash Freeze.
- Singed: Singes the enemy, inflicting 3000 Fire damage and increasing damage taken from magical spells and effects by 2% for 25 sec. Stacks up to 30 times.
Hard Mode:
Kill him in 3 mins or less.
The Fight:
This is a fairly simple fight actually. First note, only need 1 tank, and a Nuitbear in polar Frost Resist gear with 50K hp would be perfect tank for this. Other tanks are doable too, don't need Frost Resist per se, with enough HP at least. It's only that 40K frost damage blow which can probably be reduced with CDs like Sarth3D breath coordination type of thing.
Most of the raid damage is avoidable. The better we're at avoiding, the less healers we need for the fight.
Jump/run all the time to avoid the dot from stacking, like Nexus. Avoid the Icicles that fall from the sky, watch for the snowflakes, think Gruul rocks. Turn on your projected textures, these icicles are the blue circles on the ground you have to stay away from.
For Flash Freeze, can completely avoid it by being where Icicles already landed, they form Snowdrifts. During it's cast, 3 large icicles (2 in Normal) will start to drop. Get near one of these, just outside of it until the snowdrift forms, then strafe on it. If one should fail to avoid this, they will be encased in an Ice Block. That's when we have to hit the Ice Block to release him, should they be hit with Flash Freeze again while in a block, they die.
As for the NPCs, if we choose to work with them, we gotta release em from the Ice Blocks. They give us buffs, they help dispels, they even dps the boss. They are also vulnerable to Flash Freeze and not as smart as some of us. So we'd likely have to release them each time if we want to keep them around.
That's basically it, 8 minute enrage. Use the lights, use the fires, dps boss, avoid icicles, never stop moving, get on snowdrifts, profit. Loot wise, he has 2 chests. He destroys one at hard mode, one at enrage. So Hard Mode is just killing him very fast for more loots.
Achievements:
Cheese the Freeze: Defeat Hodir without any raid member being hit by Flash Freeze on Normal/Heroic Difficulty
Just a raid wide check to avoid damage.
I Have the Coolest Friends: Defeat Hodir without any friendly NPC dying on Normal/Heroic Difficulty.
This simply means we hit every single damn ice block to break everyone out after each Flash Freeze. They won't die to anything else except the insta kill flash freeze while ice blocked. Remember 8 in Heroic, 4 in Normal.
Getting Cold in Here: Defeat Hodir without any raid member having more than 2 stacks of Biting Cold on Normal/Heroic Difficulty.
Another raid check to keep moving. And quick dispels when people get trapped by frost nova.
Staying Buffed All Winter: Possess the effects of Toasty Fire, Storm Power and Starlight at the same time on Normal/Heroic Difficulty.
This might take a bit of luck. Got mine's purely by accident along with a few others. You'd need a Starlight by a fire, and have the Shaman buff you. Though I dunno how he chooses his targets to buff.
I Could Say this Cache was Rare: Defeat Hodir before he shatters his rare cache on Normal/Heroic Difficulty
Hard Mode. It's simply a defeat him within 3 mins. On 10 man, we did this 2 healers, pretty much blind zerg of the boss. Release the ice blocks of course, and take advantage of buffs whenever you can. DPS!
Trash Info:
Champion of Hodir: Single pulls, simply a big guy, has a targetted aoe breath where it freezes anyone it hits in an ice block. Like that mage deep freeze kinda ice block though. Think of it like those SSC bog lord that pick a member to spit poison at, and hits everyone inbetween. Except it's ice, and it's too late if you're already hit. Just spread out and circle around him, to mitigate the number of people hit each time.
Snowdrifts: There'll be these steaming piles of snow. When you approach em, Worms pop out. Lots of them. And one by one. So yea, aggro can be touchy since they don't all appear at once to tank and build threat.
Elemental Packs: There will be one big Revanant and 4 smaller Ice Rock Elementals. The big guy puts a shield on everyone that reduces AoE damage by 90%. What? Is Blizz trying to say we can't aoe these? Anyways, obviously, kill the big guy, then ezmode trash.
Videos:
10 man Hard Mode
25 Man Hard Mode
Sources:
- http://www.mmo-champion.com/index.php?page=848
- http://www.wowwiki.com/Hodir_(tactics)
- http://www.stratfu.com/strats/Hodir
09 - Thorim Strategy Guide
saedo — Sat, 04/18/2009 - 14:17
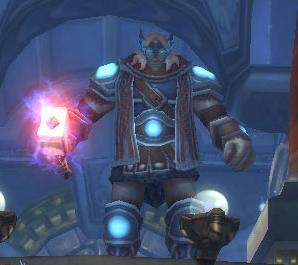 Health:
- Heroic: 20M (Hard mode)
The Fight and Abilities:
This fight is a bit more, hectic, so I'll list abilities of the adds as they appear as I go along.
Gist of it, a gauntlet arena. Adds come, we kill. Then akin to Gothik, raid must be split up with part dealing with adds, part dealing with Thorim himself.
Phase 1:
Thorim is practically immune to damage so don't bother attack him. He will be attacking us though.
- Stormhammer: Throws a stormhammer, dealing 2451 to 2551 damage to an enemy, knocking down and stunning the target for 2 sec, and causing a deafening thunderclap to all enemies nearby the target. 100 yd range, 0.5 sec cast
- Deafening Thunder: Inflicts 4625 to 5375 Nature damage to enemies standing in close proximity to a Stormhammer strike, increasing spell casting times by 75% for 8 sec. 50000 yd range, Instant
- Charge Orb: Charges a nearby orb with electricity. Causes Lightning Shock - Inflicts 2831 to 3169 Nature damage on a nearby enemy.
- Berserk: Empowers allies with the full might of Thorim. This spell will increase damage done by the adds by 500%, casting speed by 200%, and their health by 300%. This is an enrage ability casted on all the adds if players take more than 5 minutes to reach Thorim at the top of the Arena.
What we will be dealing with first are Jormungar Behemoth and Captured Horde (or Alliance if you're Horde). They shouldn't be too hard to deal with.
Jormungar Behemoth:
- Acid Breath: Spews acidic bile at a target and nearby enemies, inflicting 12000 Nature damage and 1500 additional damage every 2 sec. for 18 sec. 50 yd range, 1 sec cast
Captured Mercenary Captain:
- Devastate: Sunder the target's armor causing the Sunder Armor effect. In addition, causes 50% of weapon damage plus 90 for each application of Sunder Armor on the target. The Sunder Armor effect can stack up to 5 times.
- Heroic Strike: A strong attack that deals 3938 to 5062 additional Physical damage
Captured Mercenary Soldier:
- Barbed Shot: Fires an arrow that pierces an enemy's flesh, inflicting 4513 to 4987 Physical damage and causing 500 damage per 3 sec. for 12 sec. 45 yd range
Kill em all.
Phase 2a: Constructs
The constructs of all types (healer, casters, melee) from the stands all jump into the ring and this is where we have to split the raid to deal with them.
Dark Rune Acolyte:
- Greater Heal: Calls upon Holy magic to heal an ally for 94500 to 115500 Health. 40 yd range, 2 sec cast
- Smite: Smites an enemy, inflicting 7650 to 9350 Holy damage. 50 yd range, 1.5 sec cast
Dark Rune Champion:
- Whirlwind: Attacks nearby enemies in a whirlwind of steel that lasts 2 sec. and inflicts normal damage plus 50.
- Mortal Strike: Inflicts 250% weapon damage and leaves the target wounded, reducing the effectiveness of any healing by 50% for 5 sec
- Charge: Charges an enemy, inflicting normal damage plus 75 and stuns the opponent for 2 sec. 8-25 yd range
Dark Rune Commoner:
- Low Blow: Lands a cheap shot on an enemy, inflicting Physical damage and reducing the target's damage dealt by 3% for 20 sec. 5 yd range, Instant
Dark Rune Evoker:
- Runic Lightning: Strikes an enemy with a blast of runic lightning, inflicting 7875 to 10125 Nature damage. 150 Mana, 45 yd range, 1.5 sec cast
- Runic Mending: Heals an ally for 18500 to 21500, then heals for an additional 6000 every 1 sec. for 15 sec. 280 Mana, 40 yd range, 2 sec cast
- Runic Shield: Surrounds the caster with a runic barrier, absorbing 120000 magical damage and reducing all Physical damage taken by 50%. 330 Mana, 30 yd range, 0.5 sec cast, 6 sec cooldown
Dark Rune Warbringer:
- Aura of Celerity: Increases nearby allies' melee, ranged, and casting speed by 20%. Instant
- Runic Strike: Strikes at an enemy with an electrified weapon, inflicting Nature damage equal to weapon damage plus 1000. 5 yd range, Next melee
Iron Honor Guard:
- Cleave: Inflicts 150% of normal melee damage to an enemy and its nearest ally.
- Shield Smash: Inflicts 7400 to 8600 Physical damage to an enemy, stunning it for 3 sec.
- Hamstring: Inflicts 50% weapon damage to an enemy, reducing its movement speed by 60% for 5 sec
Titanium Stormlord:
- Cyclone: Attacks nearby enemies in a whirlwind that inflicts 100% weapon damage as Nature damage.
Again the raid must split up, remember you only had 5 minutes to reach Thorim. Part of the raid stays behind dealing with the above adds, the other part head to....
Phase 2b: Tunnel
So this part of the raid is the task force assigned to reach Thorim and force him into the arena.
There are adds here too to deal with. And the first mini boss is similar to the pinnacle gauntlet, he'll light up one half of the room with fire you just gotta stay out of. Watch which of his hands are raised.
Dark Rune Thunderer:
- Lightning Brand: Shocks the target for 3500 Nature damage to the target, and increases Nature damage taken by 40% for 20 sec. 8 yd range, Instant
Iron Ring Guard:
- Impale: Deals a vicious attack that causes the target to bleed profusely until healed past 90% of its maximum health. Deals 1750 damage every 2 sec. for 1 min or until removed via healing. 5 yd range, Instant
- Ravage Armor: Reduces the target's armor by 5%. 8 yd range, stacks up to 20.
- Whirling Tip: Knocks down nearby enemies, stunning them for 2 sec. and inflicting increased weapon damage.
Runic Colossus (Mini-Boss):
- Charge: Charges an enemy, inflicting 6938 to 8062 Physical damage and knocking the enemy back. 8-40 yd range, Instant
- Runic Barrier: A shield of runic power surrounds the caster, reducing all damage taken by 50% and inflicting 2000 Arcane damage to attackers. Instant
- Smash: Deals 37000 to 43000 Physical damage to all enemies within a 10 yard cone in front of the caster. 3 sec cast, 2 sec cooldown
Ancient Rune Giant (Mini-Boss):
- Rune Detonation: Immobilizes a target with a runic ward that detonates after 4 sec to inflict 11250 to 13750 Fire damage around the target. 60 yd range, Instant
- Stomp: Inflicts 12250 to 15750 Physical damage to nearby enemies and knocks them back. 10 yd range, Instant
Reaching the top of the arena at the end of the Hallway he'll jump into the Arena where the first part of the raid is.
Phase 3: Thorim
- Touch of Domination: Subjugates the target to the will of Yogg-Saron, weakening it yet conferring a subtle control. Reduces Thorim's health and damage by 25% if the raid reaches him after the 3 minutes hard mode timer.
- Chain Lightning: Strikes an enemy with a blast of lightning that inflicts 3700 to 4300 Nature damage. The bolt will arc to additional nearby enemies, inflicting 100% more Nature damage to each successive target. 150 Mana, 100 yd range, 0.5 sec cast
- Lightning Charge: Absorbs a torrent of electrical energy, inflicting Nature damage to enemies in a cone between the caster and the power source, and increasing the caster's melee damage and attack speed by 15%, and Nature damage dealt by 10%. 100 yd range, Instant
- Lightning Charge: Absorbs a torrent of electrical energy, inflicting 13875 to 16125 Nature damage to enemies in a cone between the caster and the power source. 150 yd range, Instant
- Unbalancing Strike: Inflicts 200% weapon damage and leaves the target unbalanced, reducing their defense skill by 200 for 15 sec. 8 yd range, Instant
DPS race at this point. Spread out for lightning. A move that kinda sounds like the 2nd Occulus boss where he charges up and lights an entire section. Anyways, kill before his damage gets too high. Maybe switch tanks for Unbalancing Strike.
Fight Summary:
Because that was a lot to take in, I'll reiterate the keys of the fight.
- Kill the giant worm and the soldiers
- Raid splits up, in 10 man we did a 4 in the tunnel, 6 remained. 25 man used 15 and 10.
- Arena Group stays and deals with adds, killing em.
- Hallway Group opens lever, enters a gauntlet, watch the Colossus' arm to know which half of the hall to avoid, he'll light it up
- Kill the Colossus, go up stairs, another miniboss, turns you into bombs, but roots you so raid has to run from you
- Then it's clear sailing to reach Thorim, watch timers if you want to attempt/avoid Hard Mode. It was actually quite easy and we reached him at about 2.5 min so took a bit of a wait.
- Jump into the arena with Thorim, finish off the adds, spread out, kill him.
Hard Mode:
To reach hard mode, we reach Thorim in 3 mins or less. Not only does he have 25% more damage and health, Sif will be around. Can't kill her, but she'll be attacking us, so more damage all around.
- Frostbolt Volley: Inflicts 9000 to 11000 Frost damage to nearby enemies, reducing their movement speed by 50% for 4 sec.
- Frost Nova: Inflicts 9425 to 10575 Frost damage to nearby enemies, immobilizing them for up to 6 sec. 2.5 sec cast
- Blizzard: A rain of ice moves around the room, dealing 3282 to 4218 Frost damage every 1 sec. for 10 sec. and lowering the movement speed by 65%.
Our Positioning:
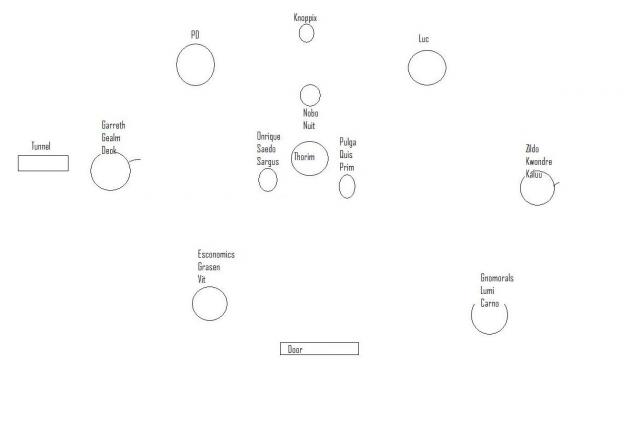 Thorim Positioning
Achievements:
Don't Stand in the Lightning - Defeat Thorim without any raid member being struck by Lightning Charge on Normal/Heroic Difficulty.
Raid check, watch the orbs around the room, don't be on the side of an active one. It's a little lightning trail the goes from Thorim to an orb. Move.
I'll Take you all On - Defeat Thorim, the Ancient Rune Giant and the Rune Colossus on Normal/Heroic Difficulty
From the words it seems to mean you were part of the Hallway group. Would have to simply rotate people to do it for this one. But atm, it seems it doesn't seems to complete regardless, so just a normal defeat of Thorim.
Who Needs Bloodlust - Defeat Thorim while under the effect of Aura of Celerity on Normal/Heroic Difficulty.
This aura comes from the mob, a Warbringer. What has to be done is a priest must MC one, pretty much at least during Thorim phase itself. Apparently this is party based, so need a priest for each party, or have to rotate each week.
Siffed - Force Thorim to enter the arena while Sif is present on Normal/Heroic Difficulty.
This is just activating Hard Mode, reach him within 3 mins. Quite easy since you don't even have to beat him.
Lose Your Illusion - Defeat Thorim while Sif is present on Normal/Heroic Difficulty.
The real Hard Mode. This is where you actually have to defeat Thorim. Basically more HP, more damage, and Sif is also throwing frost spells at the raid, slowing the raid members. Dispels will be needed for frost novas incase the aoe is on their side as well. As a note, the Lightning Charge is pretty lethal here, probably one shots you. Unlike ezmode where it's survivable damage....
Trash Info:
Vykrul Packs: They come in pairs and there's only 2 of them. The Thunderer just does damage, nature hits mostly, not very threatening. The Ravager sunders armor, a lot, able to reduce Nuitbear to zero armor with enough stacks. 10% per stack? Anyways, this means the tanks might want to trade off once they get too many. Or, just try to zerg the Ravager down fast. Very fast before the tank bites it.
Sources:


Recent comments
7 hours 17 min ago
4 weeks 1 day ago
7 weeks 1 day ago
7 weeks 2 days ago
9 weeks 1 day ago
9 weeks 1 day ago
9 weeks 1 day ago
10 weeks 2 days ago
11 weeks 3 days ago
13 weeks 17 hours ago