
25 Man

06 - Iron Juggernaut
Mehguy — Thu, 08/15/2013 - 12:54
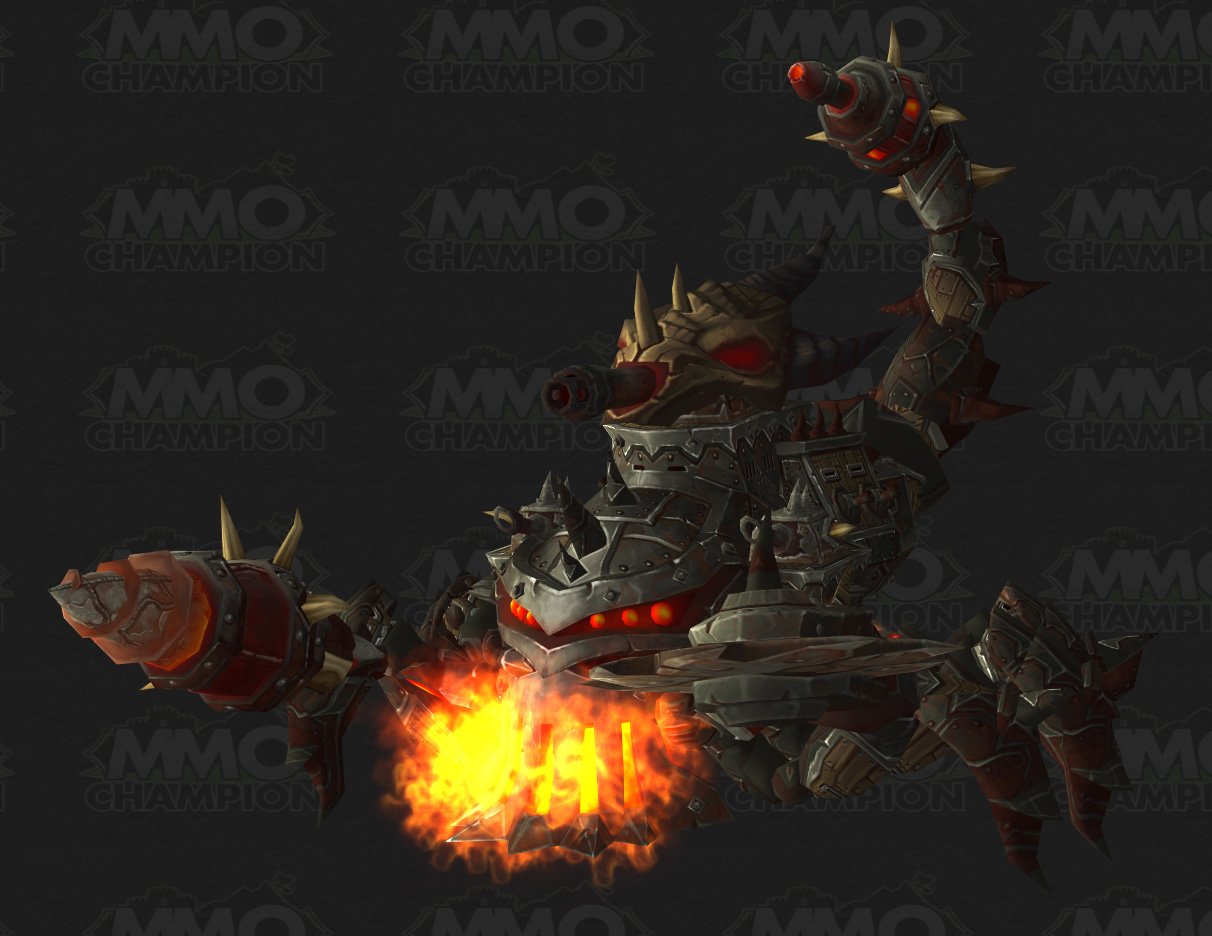
The Iron Juggernaut is the 6th encounter in the Siege of Orgrimmar raid, and 2nd encounter in the Gates of Retribution LFR
For a detailed view of the abilities and loot table across LFR/Flex/10/25 please CLICK HERE
General Strategy/Overview
This encounter is a 2-phase alternating fight. Each phase is time based, with Phase 1 lasting 2 minutes, and Phase 2 lasting 1 minute. Again, it alternates back and forth until the encouter is over or you hit enrage.
Overall this fight is probably one of the simpler fights, if not the simplest fight, in the entire raid. But that does not make it the easiest, there are some mechanics that become very problematic and deal high raid dmg.
Phase 1 - Assault Mode
During this phase, Iron Juggernaut is mobile and needs to be tanked. He has several abilities as follows.
- Borer Drill - Drills its arm into the ground, causing the earth to crack and shatter, dealing ~60k phys dmg to players in its effect. This is noted by earthquake style lines that will follow/chase players, can be out-run, etc.
- Laser Burn - His tail cannon will focus on random players dealing ~135k fire dmg to the player. Also applies a DoT that deals ~75k fire dmg every 2 secs. Lasts 15 sec.
- Mortar Cannon - His top cannon will launch an explosive at a random ranged target. This will be noted by a large red targetting circle on the ground (similar to Mimiron). When this lands, will deal ~200k fire dmg to anyone within the 8-yard circle. Cant be moved out of and completely avoidable.
- Crawler Mines - Possibly the mose damage ability in this phase. He will release several Crawler Mines that will move in the direction of random players, and bury themselves partially in the ground. Once they are buried, they begin a detonation sequence that, if allowed to complete, will deal ~240k physical dmg to all players. To counter-act this, while they are buried, players may click on them and absorb and explosion for ~100k physical dmg and get knocked up in the air. Recommended that the current "off-tank" and any players with strong phys dmg reduction spells "stomp" on them to detonate them to prevent raid dmg.
- Flame Vents - Frontal cone fire dmg spell that deals ~240k fire dmg. Applies Ignite Armor debuff, causing 10% increase in fire dmg taken and applis a dot for ~32k fire dmg/sec. Stacks! Unknown duration.
Phase 2 - Siege Mode
During this phase he will bore into the ground and remain stationary for 1- minute and will no longer focus a single target. During this phase he will continue to release Crawler Mines at a very increased rate. His new abilities are as follows.
- Seismic Activity - Drills into the earth causing an earthquake, dealing ~32k nature dmg every 1 sec to all players. During this, he will occasionally cast Shock Pulse.
- Shock Pulse - creates a wave of energy that knocks players back SIGNIFICANTLY. Players should ideally have their back to a wall/object to prevent range issues with healers.
- Demolisher Cannons - Turrents fire high in the sky over random players dealing ~120k fire dmg to players within 6 yards of the blast area.
- Explosive Tar - Spews tar puddles in all directions. Standing in tar deals ~16k nature dmg/sec and reduces movement speed by 30%. Tar puddles can be ignited by Cutter Laser, dealing ~160k fire dmg to ALL players.
- Cutter Laser - Tail cannon now focuses random players and the beam will chase the player, dealing ~140k fire dmg to anyone it comes into contact with. Reminder if this touches a Tar puddle, it will explode dealing ~160k fire dmg to the whole raid. Must kite the beam around puddles as not to ignite the tar.
So.. it essentially goes. Phase 1 - Tank facing away from the raid, and trade-taunt when appropriate. Avoid targetting circles in first phase, and out-run the Borer Drill lines. Current OT and players with def CDs click on the buried Crawler Mines to prevent high raid dmg. Phase 2 - avoid running through Tar pools and dragging the Cutter Laser through the pools. Try to avoid the blast areas of the Demolisher Cannon and do your best to have your backs against a wall/object for Seismic Activity/Shock Pulse.
Again, not an overly complicated fight, but can get crazy with dmg output and the large knockbacks in the area.
04 - Sha of Pride
Mehguy — Thu, 08/15/2013 - 12:54
 Sha of Pride is the 4th encounter in the Siege of Orgrimmar raid, and 4th/last encounter in the Vale of Eternal Sorrows LFR.
For a detailed view of the abilities and loot table across LFR/Flex/10/25 please CLICK HERE
General Strategy/Overview
For those of you who raided during T11 in Cataclysm, think of this fight as Cho'gall on steroids.
The main mechanic to pay attention to is the "Pride Bar". Each player begins this fight with this bar, it starts at 0 and maxes out at 100. You gain 5 pride each time you are hit by his abilities, or effects related to his abilities. Some are avoidable, some are not.
Norushen re-joins in this fight and assists the players, he will give the following ability randomly through the fight.
- Gift of the Titans - grants random players (will always affect at least 1 healer) immunity to Pride for 20 seconds.
- Power of the Titans - If all players with Gift of the Titans stack within 8 yards, they will gain this buff giving increased haste, dmg dealt and healing by 15% for 15 seconds.
Sha of Prides abilities are as follows
- Swelling Pride - Sha has a slowly gaining energy bar (appears to gain 1.5-2 energy per sec). When Sha reaches 100 energy, he will explode, dealing ~280k shadow damage to all players and increasing their Pride by 5. If a player reaches a certain level of Pride, they will incur the following secondary effect when hit with Swelling Pride.
- Bursting Pride (between 25-49 pride) - creates a mass of Sha corruption at the players location. After 3 seconds it will explode and deal ~240k shadow dmg to all players withing 5 yards. Any person damaged receives an additional 5 pride.
- Projection (between 50-74 pride) - forms a projection(void zone) 15 yards from the players location. After 6 seconds will explode dealing ~180k shadow dmg to all players, UNLESS the affected player is standing within the projection. Any player affected by the explosion will gain 5 pride. Players can determine which projection zone is theirs by a GREEN arrow above the zone.
- Aura of Pride (between 75-99 pride) - Players hit by Swelling Pride will receive this aura that deals ~200k shadow dmg/sec to any player within 5 yards of the affected person. Any player damaged by this aura will receive 5 pride. The aura lasts 25 secs.
- Overcome (100 pride) - When players reach 100 energy they receive this buff/debuff. Increasing their damage and healing dealt by 50%. HOWEVER, once they are hit by Swelling Pride they will become permanently mind controlled and have their health increased by 100%.
- Mark of Arrogance (healer warning) - Sha marks 2 players (5 in 25-man), dealing ~56k shadow dmg every 1 second for the remainder of the encounter. This effect stacks. The effect can ONLY be removed by SINGLE-TARGET dispells. The player who dispels (aka the Dispeller) will receive 5 pride when they dispel someone. Best to dispel when a healer is affected by Gift of the Titans.
- Wounded Pride (tank warning) - wounds the tank for 15 seconds. Affected targets receive 5 pride for each melee attack they receive from Sha while affected. Requires tank swapping.
- Manifestation of Pride - occasionally summons adds to attack players.
- Mocking Blast - fires a blast at a random target, dealing 180k shadow dmg, giving 5 pride. INTERRUPTABLE!
- Last Word - When this add dies, it will give 5 pride to the closest 2 players (unknown if it affects more players in 25-man)
- Self-Reflection - at 35 Energy, he will cast Self-Reflection, causing up to 5 players to reflect on their actions, creating Reflection adds to spawn at their locations. When casting this, he will primarily target those with 25 energy, then 50, then 75.
- When these adds are summoned, they will explode out of the ground after 2 seconds, dealing ~200k shadow dmg to players within 2 yards and giving 5 pride. It appears the best thing to do is stack, then as soon as they spawn run out so they all explode in one location and nody gets hit. See attached video to see stacking method. AoE down and clear them out.
- Corrupted Prison - at 70 Energy, he will activate 2 prisons (4 in 25-man) placing a player in each active prison. When the prison activates, it will deal ~200k shadow dmg to players within # yards, knocking back and giving 5 pride. Imprisoned players are stunned and receive ~64k shadow damage and 5 pride for every second they are imprisoned. To be relased, players must stand on the 2 orange (lit) locks next to the prison simultaneously.
- Reaching Attack - same as Sha of Fear in TOES, when there is no one in melee rangee, will deal 50% weapon dmg as shadow dmg. Will also increase shadow dmg taken by 25% for 8 seconds.
- Unleashed - When Sha reaches 30% health he will focus Norushen, and kill him. He will then pulse ~195k shadow dmg every 10 secods for the remainder of the encounter and give 5 pride to anyone hit by Unleashed.
- Final Gift - before Norushen dies, he will purify all players and reduce their Pride stacks to 0.
This fight is all about knowing how to avoid getting unnecessary stacks of Pride. From the attached vid, it appears the best strategy is to have the raid stack and tanks stack on opposite side of the boss, then when his abilities get used, quickly spread out to avoid extra dmg and pride stacks, then re-join to ensure they are always together for the Gift of the Titans buff, and to AoE adds. Tanks swap appropriately, and interrupt the larger adds when they are casting their Mocking Blast to get them into the raid to cleave/AoE down with other adds and Sha himself.
03 - Norushen
Mehguy — Thu, 08/15/2013 - 12:54
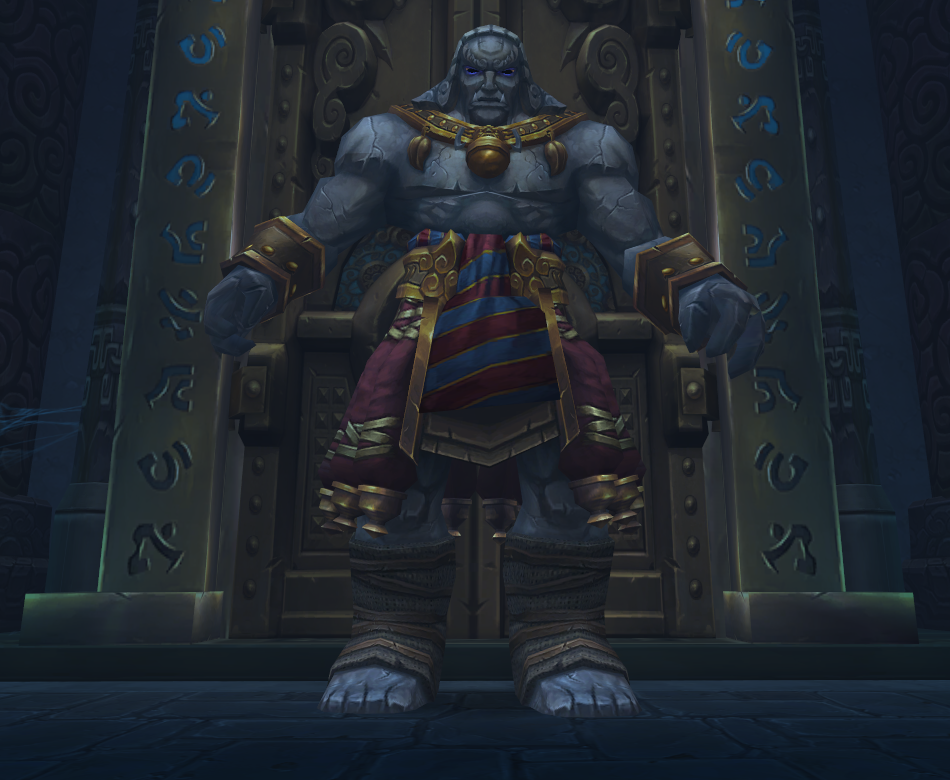 Norushen is the 3rd encounter in the Siege of Orgrimmar raid, and 3rd encounter in the Vale of Eternal Sorrows LFR.
For a detailed view of his abilities and loot table across LFR/Flex/10/25 please CLICK HERE
GENERAL STRATEGY/OVERVIEW
During this fight, you will not attack Norushen directly, rather, he is a friendly NPC and when you start the encounter, he will see you have corruption within you and seal you in a Quarantine Zone. He will pull some of that corruption from each player and form an Amalgam of Corruption. Essentially it just looks like a large Sha. This is what you must defeat to end the encounter.

During this encounter, players will have a Corruption Bar on their screens, at the start, players will start out with 75 stacks (out of 100) of Corruption. The more "Corrupt" a player is, the DPS will deal less damage, Healers will heal less, and Tanks will receive more damage. The overall goal of the fight is to completely Purify yourself of your corruption to be able to deal more dmg, heal more and take less damage. In order to become Purified, each player must go through an individual challenge.
NOTE: The reduced damage/healing/dmg received does not apply to the adds in the encounter, ONLY the Amalgam.
This encounter has a strict 7-minute enrage timer, if the Amalgam is not defeated by then, Norushen will cast Quarantine Measures, killing everyone in the room.
The Amalgams abilities are as follows.
- Unleashed Anger - slashes at his current target, deals ~320k phys damage
- Self Doubt - Tank debuff, increases the damage Unleashed Anger deals by 50% per stack, requires tank swapping.
- Blind Hatred - creates a line of corruption that will spin around the room in a 180-degree semi-circle. This can be ran/jumped through but will deal EXTREMELY HIGH dmg. Overall it will likely one shot you like Durumu's beam did. It doesnt move that fast and can be easily avoided.
- Icy Fear - Deals 60k frost AoE dmg to the raid every 3 sec. The damage increases as he loses health
- Frayed - When Amalgam reaches 50% health, and for every 10% health after, he will spawn an "Unleashed Manifestation of Corrption" add. (more below)
- Fusion - every "Expelled Corruption" he receives from smaller adds will increase the damage he deals by 8% for 15 seconds. Stacks. (more below).
REMOVING CORRUPTION / ADDS
At the start of the fight, on the left and right side of the room, there will be two spinning orbs called "Purifying Light". When a player clicks on these, they will be transported to a phased room that will contain adds, and a test that will vary based on your role in the fight. You must complete this test to be cleared of your Corruption.
- Tanks - You will be zoned into a Test of Confidence and have to face a "Titanic Corruption" and must survive for 1 minute. If you survive for 1 minute, you will be instantly ported out and cleansed of your corruption. The Titanic Corruption has some rather nasty abilities to deal with.
- Titanic Smash - deals 400k shadow dmg in a frontal cone. Can be avoided.
- Corruption - each successful melee swing gives a debuff stack of Corruption, dealing 8k dmg every sec per stack.
- Hurl Corruption - fires a ball of corrption at the tank, deals ~225-250k shadow dmg, mitigatable, possibly interruptable.
- Burst of Corruption - AoE that deals ~150k shadow dmg to all enemies, mitigatable.
- Piercing Corruption - deals 320k phys dmg to target, cannot be absorbed/mitigated, but can be avoided completely.
- Healers - You will be zoned into a Test of Reliance, where you must defeat a Greater Corruption. You will be aided by several NPCs who will already be fighting the boss. You will have to keep the NPCs alive to allow them to kill the Corruption, once it is dead, you will be ported out and cleansed of your corruption. Some guilds found it easier to just use DPS spells to help kill the Corruption faster as compared to healing the NPCs. May depend on your comfort level/class. The Corruption has a few abilities, primarily AoE, that affects all NPCs and yourself, but the primary ability you should worry about is
- Lingering Corruption - This deals 320k Shadow damage to the player/NPC if not cleansed within 10 seconds.
- DPS - You will be zoned into a Test of Serenity, you will be pitted against 5 mobs total (4 Essence of Corruption and 1 Manifestation of Corruption). To zone out of this encounter you must defeat these mobs and collected the Gold Orbs they drop. These gold orbs reduce your corruption stacks and once you remove all yout stacks, you will be ported out of the Test. Even if there is a mob remaining. The mobs abilities are as follows.
- Manifestation of Corruption - repeatedly casts Tear Reality - is a conal shadow damage ability that can be avoided/ranged.
- Essence of Corruption - Casts a ball of corrupted energy in a straight line, moves fairly quick, but can be avoided. Deals 80k shadow dmg if it strikes you.
On to the adds. Initially you will fight adds in your "Tests", BUT, once a DPS kills his/her adds in their "Test", that add will RESPAWN in the primary phase as an "Unleashed" form of themselves. And have some abilities to deal with. Remember, for each add a DPS kills, it will respawn and the rest of the raid must deal with it. Do NOT send 2 dps at once or you will get overwhelmed with adds.
- Unleashed Manifestation - must be tanked, does melee dmg and the following. These are also the adds that the Amalgam will spawn at 50/40/30/20/10% health.
- Burst of Anger - AoE that deals 40k shadow dmg to all players
- Residual Corruption - When defeated, will leave a void zone on the ground that will deal ~70k shadow damage to ALL players unless it is touched/absorbed by a player.
- Absorbing this corruption will give back the player 25 stacks of corruption. NOTE: if this mob dies on top of a group of players, all players standing in the corruption will receive the stacks. Kill away from the group and have a designated person absorb the corruption.
- Unleased Essence - stays stationary on the outter edge of the room. should be focused quickly.
- Expel Corruption - Shoots balls of corrupted energy at the Amalgam. This will deal ~80k shadow dmg to the first person it hits. If it does not hit anyone and reaches the Amalgam, it will increase its damage dealt by 8% for 15 secs (See the FUSION ability above). This stacks. Supposedly can be interrupted, and must be intecepted before it reaches the Amalgam.
The goals of the fight are to send 1 dps/1 healer, or 1 dps/1 tank into their tests simultaneously. With a 5 dps/3 heal/2 tank setup, this should balance out perfectly (for 10-man). And to try to maintain as low of a corruption stack as possible to defeat the encounter, and defeat the smaller adds ASAP to prevent the Amalgam from getting high dmg stacks and wiping the raid.
Ideally, the best way to probably counter the extra 25 stacks of Corruption from the Unleashed Manifestations early on in the fight, is to have the DPS focus the larger Manifestations first in their Test, then once it is dead and comes to the normal phase, the rest of the raid kills it immediately and have ONE person absorb it, getting their stacks from the base 75->100 and then have that player go complete their Test, there-by removing 100 stacks of Corruption instead of just their base 75.
The fight gets very hectic at the end for healers, so its best for them to not have any extra stacks of corruption at the end so they can get as much healing output as possible from the extra damage Amalgam has received from either "Expel Corruption" or from the stacking Frost damage "Icy Fear".
02 - The Fallen Protectors
Mehguy — Thu, 08/15/2013 - 12:54
 The Fallen Protectors is the 2nd encounter in the Siege of Orgrimmar raid, and the 2nd encounter in the Vale of Eternal Sorrows LFR.
For a detailed view of his abilities and loot table across LFR/Flex/10/25 please CLICK HERE
General Strategy/Overview
This encounter is a single-phase council style fight, similar to the Conclave of Wind encounter in Cataclysm. These bosses have their own individual health pool, and must be killed simultaneously/within 15 seconds of each other. They have a group aura called "Bond of the Golden Lotus" and if any boss reaches 1% health and any remaining boss(es) are still active, they will channel an ability that will restore 30% of their maximum health if completed. So again, all must die within 15 seconds of each other.
They all each have a shared ability called "Desperate Measure". When one of them reaches 66% and 33% health, that specific boss will become invulnerable/vanish and spawn 1-3 embodied spirits that need to be killed in order to force the boss to rejoin the fight.
Because of this, there doesnt appear to be any preferred order to kill the bosses as their abilities do not change throughout the fight, and since they all must die simultaneously, it is best to just progressively bring them all down one at a time. Bring one down to 66%, kill its spirit adds, then bring the next boss to 66%, kill spirit adds etc, and just keep progressively wittling them down.
Rook Stonetoe
Rook's is a Monk/Warrior type boss. Must be tanked. His primary abilities are as follows
- Vengeful Strikes (tank warning) - stuns his current target and deals ~140k phys dmg 2 times/sec for 3 seconds. (6 hits total)
- Corrupted Brew - Hurls a keg at random targets dealing ~100k shadow damage to anyone within 5 yards and slows them by 65% for 15 sec
- Clash - targets a random player and forces them to charge him. Both the affected player and Rook will meet 1/2 way from where they were standing and he will immediately do "Corruption Kick"
- Corruption Kick - a spinning crane kick-style ability that deals ~95k phys dmg to targets within 10 yards every sec for 4 seconds, will also apply a DoT dealing 60k shadow dmg every 2 secs for 6 seconds.
- Desperate Measure - When Rook reaches 66%/33% health, he will go invulnerable/immobile and spawn 3 embodied spirit adds. Once all 3 adds are killed he will rejoin the fight.
- Embodied Sorrow (kill 1st) - casts "Inferno Strike", sending fire spell at a random target and splits damage between all targets within 8 yards
- Embodied Gloom (kill 2nd) - casts "Corruption Shock", sends a corrupted lighting shock at random locations, dealing ~120k nature dmg to anyone within 4 yards. IS INTERRUPTABLE!!
- Embodied Misery (kill 3rd, should be tanked) - casts "Defiled Ground", smashes the ground, dealing ~275k physical dmg to the current target and knocking them back (should be the tanked). This will also leave a damaged area on the ground, dealing ~80k shadow dmg every sec to anyone in it.
He Softfoot
He is a rogue style mob, and utilizes bleeds and poisons like any good rogue. Must be tanked. His abilities are as follows
- Garrote (healer warning) - essentially shadowsteps and places Garrote on a random player, deals 64k phys dmg every 2 seconds. This ability can ONLY be removed once he hits 66%/33% health and enters "Desperate Measure"
- Gouge (tank warning) - Stuns current target (tank), and will then fixate on a random target until taunted. If his Gouge target is facing AWAY from him, they will not be stunned, but just knocked back instead. Tanks should watch DBM timers and turn away when he is about to Gouge you.
- Master Poisoner - Will randomly apply poison to his weapons
- Noxious Poison - causes his melee attacks to spawn poison pools on the ground, dealing ~68k nature dmg every second to players standing in them. CAN be jumped over. Will disappear once he enters "Desperate Measures"
- Instant Poison - sucessful melee attacks deal ~60k additional nature dmg.
- Desperate Measure - Will Vanish away and spawn 1 Embodied spirit add at 66% and 33% health.
- Embodied Anguish
- Mark of Anguish - places this on a random player, causing him to focus that player and deals periodic shadow damage and roots the player in place. The player marked will receive an extra action button, allowing them to transfer the "Mark" to a different player within 30 yards. Should ideally be passed to a tank.
- Shadow Weakness - debuff applied when he strikes his focused "Mark" target, increasing shadow damage taken by the "Mark of Anguish". Each time the "Mark" is passed, the ENTIRE raid will gain 1 stack of this. Try to limit the passing of the "Mark" to prevent high stacks.
- Embodied Anguish
Sun Tenderheart
Sun is like a shadow priest, She remains stationary and is not required to be tanked. Her primary abilities are as follows
- Sha Sear - Causes an explosion of shadow dmg around her current target, deals increasing shadow dmg to the target every second and to all players within 5 yards of the affected player.
- Shadow Work: Bane - Places a DoT on multiple targets (2 on 10-man PTR) which deals ~80k shadow dmg every 3 seconds for 18 seconds. In addition, every time this ability deals damage, it will jump to an additional target, up to a total of 3 times/jumps. So if you have 2 people affected initially, both will jump after 3 seconds, making 4 affected total, etc. THIS CAN AND MUST BE DISPELLED.
- Calamity - Deals 30% of all players maximum health as Shadow dmg. This will also remove the "Shadow Word: Bane" from players who are still affected by it
- Desperate Measures - Sun will place a dark shield around her, making her immune at 66% and 33% health.
- Dark Meditation (healer warning) - During her DM, she will pulse moderate-high shadow damage to the entire raid until she comes out of DM. The damage is cut by 50% if players are standing in her dark shield with her.
- Manifest Emotions - She will spawn
- Embodied Despair and Embodied Desperation adds on either side of her while she is shielded. These adds constantly spawn miniature adds that run to attack you until the larger ones are killed. ALL adds (both the large Despair and Desperation, and their spawns) are shielded and will reflect damage back to the player that attacks them. The 2 large adds must be brought down quickly, but do not kill yourself doing so.
Thats it. A lot of abilities to cover, but overall should be a relatively uncomplicated fight.
Pick which boss you want to focus and just rotate through them. When one enters its DM, focus down the spirit adds that spawn to break them out of DM and keep rotating. The big thing is just remembering all of the abilities of the Bosses, their spirit adds, and how to counteract them.
01 - Immerseus
Mehguy — Thu, 08/15/2013 - 12:53
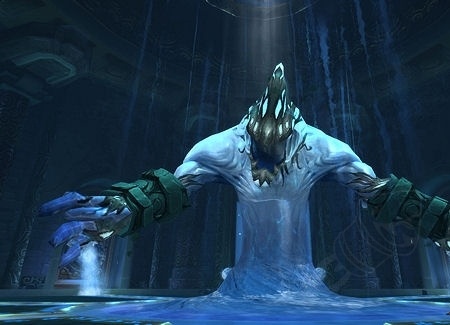
Immerseus is the first encounter in the Siege of Orgrimmar raid instance, and First encounter in the Vale of Eternal Sorrows LFR.
For a detailed view of his abilities and loot table across LFR/Flex/10/25 please CLICK HERE
General Strategy/Overview
Immerseus begins the fight with 100 Corruption, which is noted as a power/energy/rage style bar. The objective of the encounter is to cleanse him of his corruption all the way down to 0. Each time that Immerseus is reduced to 0 health, he will split into a mixture of dark Sha Puddles and watery Contaminated Puddles. The puddles will begin moving back to the center of the room. The DPS must destroy the Sha Puddles, and healers must heal the Contaminated Puddles to be able to purify them before they reach the center. Following each "Split", Immerseus will reform with reduced health and Corruption based on how well the raid performed during this period. This cycle will rinse and repeat throughout the fight until he is cleansed.
Phase 1 - Water Elemental
Primarily, tanks need to tank him so he does not directly face any raid member. His "Corrosive Blast" is a conal ability that deals high damage and gives a stacking debuff (lasting 45 secs) that increases shadow damage taken by 10% per stack. Requires trade tanking.
He will often cast "Sha Bolt", dealing low-moderate shadow damage to all raid members and leaves a small dark pool on the ground, move out of it to prevent extra damage, i.e. stay out of "fire". Only move as far as you have to, cause the pools to overlap to give yourself and the raid more freedom to move for his next ability.
His next ability is "Swirl" this will spawn several lighter blue pools and move along the floor fairly quickly, ensure you give yourself enough room from the "Sha bolt" pools to be able to dodge them safely. This will deal low shadow damage but knock you back. Could be detrimental if healers constantly get hit by this.
For Melee players, do not get too close to the boss or you will get hit with "Seeping Sha", this is noted by the large pool surrounding him. This will hit for moderate dmg and knock you back.
Phase 2 - SPLIT
Again, once he reaches 0 health, he "Splits". Any dark or watery pools that are still up from the "Sha Bolts" or the "Swirl" will immediately go to the middle of the room. LET THEM, these do nothing.
The primary pools you need to watch are the Sha Puddles and Contaminated Puddles. The Sha will be dark, the Contaminated will be more watery in color. For every Sha Puddle killed, and Contaminated Puddle cleansed, he will lose 1 percent of his remaining Corruption bar. When he re-forms, his health should be equal to the amount of corruption he has. So if he is at 77 stacks of corruption after a re-form, he will start at 77% health, etc.
Sha Puddles - he will form 1 Sha Puddle for every 4 units of corruption he has. So on the first split, since he has 100 corruption, he should spawn 25 Sha Puddles. That is based on Dungeon Journal entry, but from videos it doesnt "appear" to be that many, it also contradicts the next part of the journal entry as well by watching the video.
Once a Sha Puddle is destroyed, it will give "Sha Residue" to players within 10 yards, dealing 25% increased damage to other Sha Puddles. This STACKS!
Contaminated Puddle - he will form 1 Contaminated Puddle for every 4 units of corruption that have been previously removed. This is where the dungeon journal and video are contradictory. Based on the journal entry, on the first Split, there should be NO Contaminated Puddles to cleanse since he is at full corruption, but the video clearly shows Contaminated Puddles available to be cleansed. It may not be like that "live" and they may have only had them available for PTR testing purposes. Regardless, once these are healed/"cleansed" they will turn a dark blue color.
When a Contaminated Puddle is healed, it will progressively slow down in proportion to the amount of healing it has received until it is fully "cleansed". Once a Contaminated Puddle is cleansed, it will restore 25% of mana to allies within 10 yards and increase healing done by 75%, this STACKS!
Once either of the puddles reach the center of the room, Immerseus will pulse AoE dmg to the raid, based on the type of puddle that reaches him. If a Sha OR Contaminated Pool reaches him, he will pulse for around 100-110k shadow damage. Once a Purified Pool (yes, one that is fully healed) reaches the middle, it will only pulse for around 40-45k. So ideally you want to kill all of the Sha Puddles and heal as many of the Contaminated Pools as possible, so when they any remaining get re-absorbed you dont wipe to the AoE damage.
TLDR (go back and read it)
This fight is fairly straight-foreward and shouldnt take long to get past. Tank swap when appropriate, assuming 2 stacks. Stay relatively spread, and overlap your own Sha Bolt pools so you have room to move. When he splits, DPS the dark pools and HEAL the watery pools so you have less AoE to deal with on the re-absorb/re-form. Raidwide defensive CDs are likely best used later in the fight. There will likely be more Sha Puddles up dealing more damage in the beginning, but at the end, it will be harder on the healers as there will be a LOT more Contaminated Pools to heal, more than the healers can handle by themselves, so there MUST be hybrid healing on them at the end. Overall it will best be determined how your raid make-up is and where you feel it will benefit the most.

The state of Gorgonnash and Raid Man Hug
Elapsed — Mon, 04/08/2013 - 12:47
Several years ago during Wrath of The Lich King <Downfall> ran two 25 man raids and countless 10 mans. Back then we had the joy (imo) of having separate raid lockouts. You could take your holy pally and run your elite 10 man and then join up with the others for a 25 man of the same content later that week (or the same days). At the end of WoTLK Blizzard decided it was their job to say how we wanted to raid/play (as they do with every game) and limit us to a shared lockout. This meant if you ran with your elite squad on Tuesday through Icecrown Citadel then when 25 man came around Wednesday that you either were completely screwed or needed an alt that could fill your role. During this time 25 man and 10 man had different loot tables, there was mass benefit to run both if you were a min/maxer. Then Cataclysm came around and they made it so 10s and 25s dropped identical loot. This has all but killed 25 man raiding. <Downfall> attempted a 25 man raid then, they lasted for about a month before breaking into 10 mans due to attendance issues. Cata kept rolling and people had their 10s. We didn't interact much with people outside of our groups. I'll be the first to admit I didn't know ANYONE in a couple of the raids. I would see new names in guild and have no clue who they are or why they were here.
Mists of Pandaria rolled out and two 10 mans had survived the chaos that Cata left us in, Raid PMS and Redd Foxx. We didn't really interact at all but we saw a ton of old guildies return. What we saw most of all though was a plan, a plan that could bring back <Downfall> from a couple of segregated groups, and back to a community of people, friends, and family.
Now that you understand why and how <Downfall> is where it is today, I want you to understand why I believe the 25 man is key to the success of the guild as a whole.
The last couple of weeks Raid Man Hug has had attendance issues to say the very least. When we do all come together (with our brains in and ready to play) we accomplish some pretty damned amazing things. But that's not what we've been getting.
So I'm here for a couple of reasons, one is to do this. When you're looking at planning things in life, if and when you can plan around raid please do, we count on each and every one of you. No I'm by no means saying put all life on hold, that’s a stupid proposition and I would never purpose it. Also come to raid ready to be 110% of what you can be. When we need someone to do a job on a door or something STAND UP! And shout I can do that! And then execute that job as perfectly as you can. Also come educated, come with strats in mind for fights we haven't done. Come with new ideas to purpose! Atar and the rest of us can't be left holding the baton for telling everyone how each should play. You need to know your class! You need to know what addons you have and whether or not they were updated recently, and you need to know how to play.
Raid Man Hug has accomplished a great many things in the past months. Now comes the trials that <Downfall> must face together. We must recruit, we must come to every raid we can, and we must be 110% of who we can be. Only then will we continue to succeed!
Your Extra Action Button And Bartender 4
Elapsed — Tue, 02/12/2013 - 14:32
Since Cata we have had bosses that engage an extra mechanic to fights. Whether it be a bar we don't want to fill, or some button that we need to press to save ourselves. If you haven't Encountered this button yet there are 2 scenarios. You're doing the mechanic wrong, Or you never set up the button with Bartender4.
This tutorial will show you how to position your Extra Action Bar so that you can see the button you NEED to press
1) Opening Bartender4 -- Type /bt and hit enter
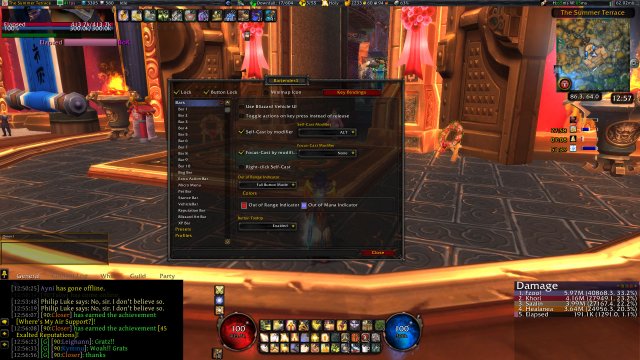
2) Click "Extra Action Bar" in the left menu
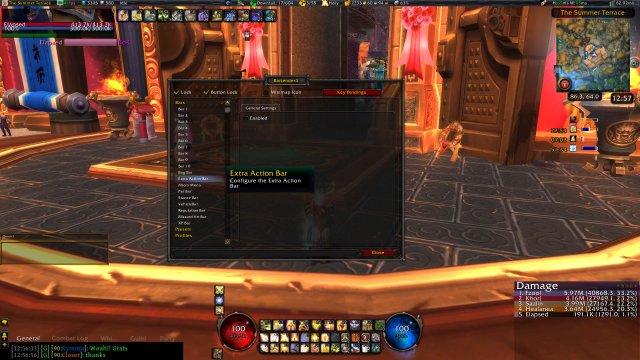
3) Either Check, or Confirm that Enabled is Checked
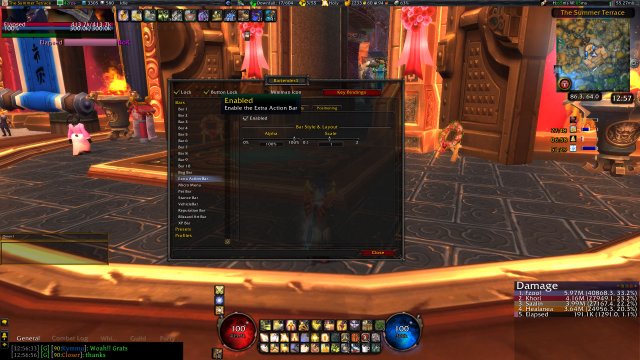
4) Click the tab titled "Positioning"
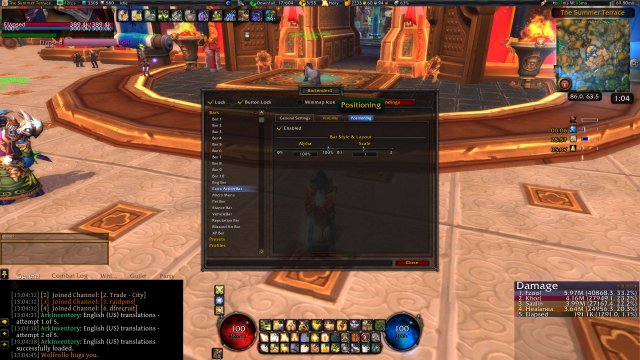
5) Click the button "Reset Position"
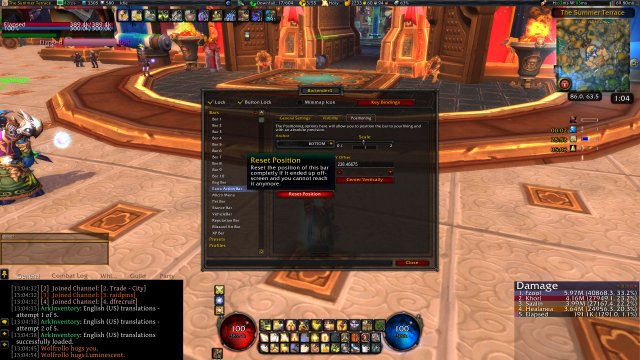
6) Drag Bartender to the side by click and holing where it reads Bartender4 at the top of the addon and uncheck the Lock in the top left corner of the addon
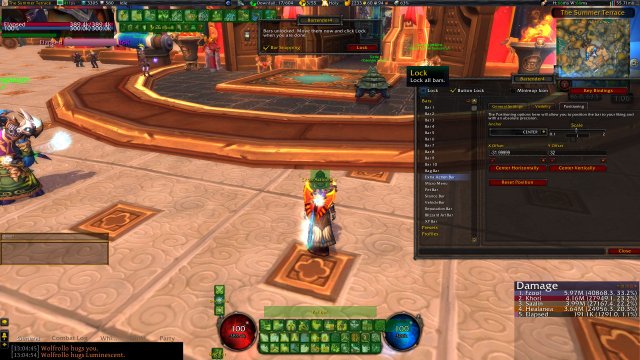
7) See that green box in the center of the screen that reads "Extra Action Bar"? Click and drag that to a place that you will see it in combat and be able to click it quickly
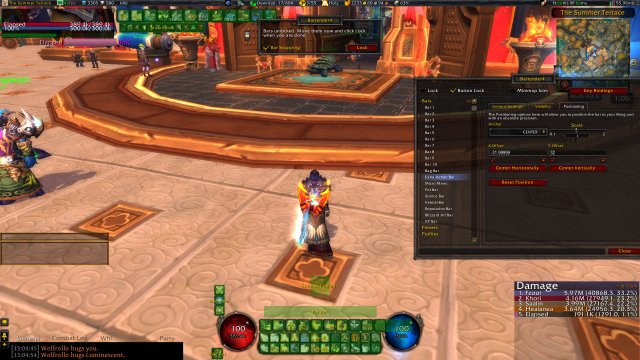
8) Click the Lock Button once more and close the addon. Congratulations! You've setup your Extra Action Bar and now you will be ready to click it when you need to.
25 Man Elegon Strategy
Elapsed — Sun, 01/20/2013 - 17:45
Welcome to our 25 Man's Elegon Strategy
This strat is broken down into multiple phases, and they will be listed below in order.
- Phase 1 (Boss and big add)
- Phase 2 (Orbs)
- Phase 3 (Piliars and small adds)
- Phase 4 (Final Phase and adds)
The order the fight proceeds is
- P1
- P2
- P3
- P1
- P2
- P3
- P4
(Temp note: Boss Blueprints doesn't have Elegon yet and I will use their Al'Akir blueprint till they do. The numbers will denote the pillar and the circle in the center of the blueprint will denote the platform we fight Elegon on)
Phase 1

This is a bit of how like Phase 1 will look just after the pull of the fight. Tank #1 will do a countdown and pull the boss. Melee will move in to the side near the back leg (or mid of the body) and range will stack just barely on the platform right next to the computer Loremaster Cho activates.
Main Abilities To Know
Materialize Protector - As the link says it's spawns a Celestial Protector that must be dealt with. The protector will occasionally cast Arcing Energy which applies Closed Circuit (cleanse needed to avoid25% reduced healing debuff. Is Magic) Upon reaching low health will begin to cast Stability Flux (healer Warning) and at death will cast Total Annihilation (damage reducing CDs helpful)
Tank Note: The Protector gains the Touch Of the Titans buff on the platform just as we do, Off the platform The Protector takes massively reduced damage. So upon reaching 15% hp or so you need to take them off the platform so that when they Annihilate us they don't have the 50% increased dmg buff
Touch Of The Titans - As the hover over says it increases the Damage you do and the Healing you recieve both by 50%! However there's a downside you will begin to stack the debuff Overcharged
Healer note: While the increase to healing recieved is a nice feature to have on everyone else. It serves little purpose to have on you. With the strategy I lay out here you can simply stand just off the platform and be able to reach EVERYONE including tanks and melee (presuming theyre in the right spot)
Overcharged - Every 5 seconds or so you're on the platform with Touch Of The Titans you will gain a stack of Overcharged. it increses the damage you take by 5% PER STACK. This can be maintained by the healers for a few stacks but should be cleared off every 7-10 stacks to alieviate healer's mana drain. Fortunately to get rid of ALL of your stacks you simply leave the platform for a second and come back on!
Ranged DPS note: If you stand JUST on the edge of the platform (you'll have to play with it) you can simply jump to remove stacks. It seems that it thinks you've left the platform at the height of your jump and you will see youself turn back to normal form for that split second
DPS Jobs
DPS in this phase will have 2 focuses for DPS The Celestial Protector is a focus and so is Elegon himself. Melee DPS will have a VERY rough time on this fight as you get to DPS Elegon very infrequently, However! your task is of the utmost importantce! You are tasked will killing the Protectors as they spawn. (as seen in blueprint #2) This will allow you to reset your stacks as you go out to kill him, and then move back in on the boss to DPS AS MUCH as you can before the next one spawns.
Ranged: as long as melee isn't lacking that night you should be able to Tunnel vision on the boss for this phase.
Tanks: Possibly the most difficult job you two must swap the boss. At the start Tank #1 picks up boss and Tank #2 waits patiently off the platform until shortly before the add spawns. Tank#2 picks the boss up off Tank#1 so Tank#1 can pick up the Protector and drag it to the edge to be DPS'd down (see blueprint #2)
Healers: Stand outside the platform barely (or move in when the tank goes to pick up the add to keep range) and heal the raid and tanks. The tank on the boss will have a few things being done so make sure to keep him/her topped off. Also the MAGIC debuff Closed Circuit MUST BE CLEANSED as it reduces all healing taken by 25% to its target. Since it's applied to so few and so infrequently a priest's Mass Dispell is the best spell for the task.

At 85% The boss will tranition into Phase 2 (orb phase) When aproaching this if there is an add still up all DPS should focus him so that people can move into position for Phase 2
Phase 2 (orb phase)

Important Abilities To Know
Draw Power : Before each wave of orbs spawn this debuff will be applied once to Elegon. Aim to have at least 10 stacks by the final phase.
Focus Power : This is the Energy orb you MUST DPS! Each wave of them will move faster from Elegon to the pilliars (blueprint #3 piliars are the Numbers 1,2,3,4,5,6)
Energy Charge : 1.47 million hp each Normal 25 mode.HEALER WARNING- Upon death will deal damage to the entire raid (roughly 10% hp but it scales with the number of stacks of Overcharged people have as well)

DPS Jobs -
Melee: You will be split evenly (as best as possible) amongst the 6 orbs (as denoted by the symbols in blueprint#4 square, triangle, moon,star,diamond, and circle) When they first spawn if you stand near the middle orb on either side you can Cleave all 3 and the boss with your cleave abilities i.e. DK's and spread disseases to all of them. Then you move with your orb till it dies. Reset your stacks of Overcharged and move back into the boss ASAP
Ranged- stand on the edge of the platform in between piliars. i.e. if you're part of Trinagle a.k.a. Pilar 6 you should be between 5 and 6 roughly be in range of both the boss and your orb along with orb 5. Your Orb is of the utmost priority at this time. DPS elegon until the orbs spawn, kill your orb and if an orb near you needs help do whatever you can. Then turn back to the boss ASAP and repeat. Remember you will still have Overcharged and need to reset 7-10 stacks
Tanks - You're floating DPS in this phase as there is nothing for you to tank. You start just as the melee do and move to the orb that needs the most help on your side (you'll get a feeling for which one needs you the most) Reset your stacks once the orb dies and then return to DPS elegon as well
Healer Job - Heal, heal, heal and then heal some more. As with the ranged dps you should be between piliars off the platform healing everyone. Each time a single orb dies they do damage to the raid and you need to be ready to heal it up ASAP. Depending on the # of stacks of Overcharged a person has the more damage they will take from an orb death.
IMPORTANT HEALER NOTE - After wave 4 of orbs there will be no new incomming damage for a little while. You will have time to use a Potion Of Focus. I find on my Holy Pally in 10 man I tend to use it on the 2nd time we reach this point (just before the final phase) 15k more mana than a standard mana pot so have them , love them, use them.
This phase in a nutshell is easy, follow your job based on above and kill 4 waves of orbs. When the 5th wave spawns ignore it and DPS Elegon until they reach the piliars. Melee needs to run off at this time (except if you have an ability to teleport you off the platform) and ranged needs to move off the moment DBM reports 6 seconds left. All DPS, Tanks, and healers MUST position themselves between 2 piliars to maximize abilities.
At this time the Platform under Elegon will vanish, leaving all who are left on it to fall to their dooms! and completely unavailable to Battle Res's.
Phase 3 (piliars and small adds)

Important Abilities To Know
Empyreal Focus - The piliars of which I spoke of earlier in this strategy and also denoted as numbers 1-6 in my blueprints. They each have 4.33 million HP, create a wall of blue fire out to the wall preventing movement through them without taking damage. They cannot de-activate until their partener piliar is brought to zero HP as well. Example 1 cannot de-activate until both it and 4 are brought to zero HP.
Cosmic Spark - These adds are occasionally shot out at players by Elegon. They each have 2.363 million HP. WARNING there will be a lightning circle that apears where the Spark will land on the ground. If you stand in it you will die or come very very close. In short don't stand in the Lightning. These adds should be cc'd until the tank on your side can pick them up. And will be dealth with at the end of this phase. NOTE: they can spawn unevenly spread so that one side could have them ALL so be prepared to kite them!
In phase 3 people all share the same jobs
- DPS piliars down to 0 (ranged if your where you should be you can DPS all 3 piliars on your side from next to the middle piliar)
- Stay out of Lightning Circles
- Kite adds until the piliars are down
Above in blueprint#5 you will see how people should be theoretically split. Melee on orb/piliars 2 and 5 will need to decide which side needs them most as attempts happen and decide which side to be on the next phase 2 or attempt.

Phase 3 completes with the platform returning (after all piliars are down, can take a few seconds or so for the floor to return) We then group up in one spot (green circle blueprint #6) and AOE the adds down. EVERYONE stacks except for the tank who picks up the boss, as anyone can have agro on them and they need to die quickly. EXCEPT ON FINAL PHASE AS WILL BE NOTED BELOW
Phase 1,2,3 Happen again in order (2nd phase 1,2 transition is at 50%)
After The floor returns in the second Phase 3, The final phase will begin.
Phase 4
Important Abilities To Know
Radianting Energies - This has 2 areas in which it effects.
On the Platform : people will be taking pulses of damage every second Damage reducing and healing CDs will be needed as the raids Overcharge increases
Off The Platform : Being a DPS or Healer you can die in a second of being Off the platform depending on your Overcharge stacks. Just stay on the boss. Tanks will have to make it quick to reset stacks because this will hurt and your healer wont have much mana to help you with

Upon the return of the floor the raid will stack on the bosses ass (see Blueprint #7) and the DPS will kill all of the small adds AS FAST as possible. A tank #1 will have the boss, Tank #2 will have the adds.
DPS Jobs - ADDS > Elegon just that easy, forget your stacks exist and just stand there and tunnel Vision on the adds then NUKE THE BOSS!
Hero Note: Hero should be used once the adds go down. Don't wait for it to be called, just hit it once the adds are all dead.
Tank Jobs - You have a messy one here but it's your time to shine! Tank #1 grab Elegon after the second Piliar phase Tank #2 grab the adds on the bosses ass and help the DPS nuke them. Then Tank #2 reset your stacks AS QUICKLY as humanly possible and get back to taunt off Elegon so Tank #1 can do the same. Just keep trading until the boss dies.
Healer Jobs - I must say, this will be the hardest you've ever pushed. You'll probably be close to 30-40% mana or less and damage will be ever increasing but you must rotate CD's and heal until you die or Elegon does. Since everyone will stack in the same spot the entire raid will be increasing stacks of Overcharge and damage will only get worse from the Radating Energies. You can do it!
If you did both Phase 2's correctly Elegon will have 10 Stacks of the Draw Power debuff, increasing the damage he takes by 100% (ignore what wowhead says it's 10% each stack) After you get the adds down pop hero and blow up the boss. Use every CD you can to increase your dps and even just to survive.
Asuming you did everything here correctly you will be looking at a chest with gear in it, Congrats on Killing Elegon!
Happy Ending Omnitron and Ugly Atramedes kill
dreziak — Sat, 02/26/2011 - 12:51
Happy Ending Valiona and Theralion
dreziak — Thu, 02/10/2011 - 21:49
http://www.youtube.com/watch?v=0GN05qQTdEs
Pretty messy, but this was our second and quite a few people that wern't there on our first kill.


Recent comments
7 hours 17 min ago
4 weeks 1 day ago
7 weeks 1 day ago
7 weeks 2 days ago
9 weeks 1 day ago
9 weeks 1 day ago
9 weeks 1 day ago
10 weeks 2 days ago
11 weeks 3 days ago
13 weeks 17 hours ago