
WotLK

12 - General Vezax Strategy Guide
saedo — Wed, 04/22/2009 - 15:22
 Health:
- Heroic: 30M
- Normal: 8M
Abilities:
- Aura of Despair: Prevents mana regeneration from nearly all natural sources. Aspect of the Viper, Judgements of the Wise, Shamanistic Rage, and Spiritual Attunement remain at least partially effective. Also reduces melee attack speed by 20%
- Mark of the Faceless: Inflicts an ancient malediction on a target, siphoning 5000 health every 1 sec. from enemies near the target, for 10 sec. 100 yd range
- Shadow Crash: Fires a shadow missile at a target, dealing 11310 to 12690 Shadow damage to all enemies near the impact point and knocking them away. After impact, leaves an energy field that lingers for 20 sec, increasing magical damage dealt by 100%, increasing casting speed by 100%, reducing healing done by 75%, and reducing mana costs by 70%. 50000 yd range, Instant
- Searing Flames: Deals 13875 to 16125 Fire damage to all enemies within 100 yards, superheating their armor and reducing its ability to protect them by 75% for 10 sec. 2 sec cast (interruptable)
- Surge of Darkness: Empowers the caster with dark might, increasing physical damage by 100% but reducing movement speed by 55%, for 10 sec. 3 sec cast
Saronite Crystals:
- These spawn and fly around the room. Should we choose to kill em (we will for ez mode), they drop a:
- Saronite Vapors: Converts life force into pure mana energy. Instant (it stacks as you sit in it)
Saronite Animuls:
- After the 8th Saronite Crystal, this guy will spawn
- Heroic 8M hp
- While this guy is up, Vezax is invulnerable, but still interruptable.
- Profound Darkness: Inflicts 500 damage to all enemies, and increases Shadow damage taken by 10% per application. Instant (stacks to 20)
The Fight:
There is little to no mana regeneration in this fight except from that single potion, and the Saronite Vapors. Reduced effects from your talents, like Viper, Wise, etc.
Healer rotations must be set up.
He does a Mark of the Faceless buff randomly, it's the new "bomb" except all the damage you do will heal Vezax, so stay away from everyone if you have it. It'll do 50K of healing per second of everyone you hit.
He does Shadow Crash, which launches a missile, we've all seen this before. Like Old Kingdom, or Mimiron's rockets as we'll get to know. Don't stand in those. What's different is that it leaves behind an energy field that buffs us, for the most part. Casters and Hunters can take advantage of this. So we should be trained by Hodir to do this, avoid shit that falls, then stand in shit after it spawns the good stuff after it falls.
He does Searing Flame, that is interruptable. Do that.
Surge of Darkness, this is where we gotta just stay away from him, and have the tank kite him. Remember aggro! So careful on dps while tank is kiting. Think of it a bit like Anub's Locust Swarm. Kite!
There are crystals that fly around, we kill em for ezmode. They drop a gas cloud that restores mana while taking that exact amount from health. It stacks, and stacks up pretty fast, so don't sit in them too long. A good time to do this is during kite phases. Set up our rotation to who gets in first for mana, and have some aoe healers take care of them.
Kill it, kill him, collect loots.
Hard Mode
Don't attack crystals, don't kite Vezax either. Use CDs (if neccessary) to survive the Surge. In fact, it's probably best to save the best ones for when the Animus appears as that's when big damage occcurs.
Have at minimum 3 people in ranged spot (in 10 mans). The Shadow Crashes and Marks will only target ranged if that is the case. So if you got enough ranged, the healers can hang out in melee range to avoid them. Goal is to not get hit with Shadow Crash. You can either do this via spreading out and everyone on their own, and have to watch for it. Or group up entirely, and move as a singular group.
Note: Resto druids can melee boss to get clear casting procs for their hax healing.
You have 4 mins before the 8th crystal spawns, and the Animus appears. Goal is to have Vezax down to 20% ish by then. Switch to the Animus, Vezax no longer casts the fire thing (in 10 man at least). Now here's where boss mods can bug out and stop broadcasting Shadow Crashes. The ranged have to be well aware of this and watch shadow crashes. With the Animus' debuff, they can start one shotting you. Also, have Shadow Protection Pots ready for use.
After burning down the Animus, it's the home stretch. Finish off Vezax, remember to kick again, and hard mode is yours.
Achievements:
Shadowdodger - Defeat General Vezax without any raid member being hit by Shadow Crash on Normal/Heroic Difficulty.
Just a raid check, avoid it.
I Love the Smell of Saronite in the Morning - Defeat General Vezax after defeating the Saronite Animus on Normal/Heroic Difficulty.
This be hard mode. Don't kill crystals, after the 8th, this guy spawns. Kill him then Vezax I suppose.
Trash Info:
Twilight Packs: These are a group of humanoids (mostly) of various classes that are CC'able and stuff. Priest heals and fears. Rogue runs around killing and fan of knives and deadly poison. Fire and Frost mages do their respective spells. Arms warrior bladestorms. Prot warrior concussion blows. Elemental Shaman with Fire Elemental doing their thing. They don't all necessarily show up in the same pack, it's like a random 5 of those and can wind up with 2 of each. So, if you have some CC, go for it. Tank the rest, burn down the Priest and do it well away from anything else to not get feared.
Faceless Dudes: There are a few of these on the way. They do the Shadow Crash, don't stand in them. They also mana burn, don't be near him. Every 25%, it spawns a Voidwalker which makes him immune to damage. Kill that, which makes him explode with a knockback, so don't be knocked into other trash. Then go back to the Faceless One, repeat.
Videos:
10 man Hard Mode (w/ Shadowdodger)
Sources:
- http://www.mmo-champion.com/index.php?page=849
- http://www.wowwiki.com/General_Vezax

WoW Ubuntu 3.1 Guide - Step 4: Installing and Configuring World of Warcraft
Fjork — Mon, 04/20/2009 - 08:16
Step 4: Installing and Configuring World of Warcraft
Open / Install Warcraft Folder in Wine
If you converted to Ubuntu on a dual-boot (didn’t format) you can actually open the World of Warcraft folder from your previous installation. I hope you did backed up all of your files and patches just in case.
If you didn’t convert, download the Install.exe for Warcraft from Blizzard (6.5 gb) and when it is done, Right-Click on it, and select “Run with Wine”.
Find some mirror sites (or archive) for the patches. Same thing for each patch. Right-Click “Run with Wine.”
*Note* If you have to install (as opposed to playing directly from installed w0w on your Windows install), you will not have a Config.WTF file, you will instead have a RunOnce.WTF file.
*Note* The Blizzard Updater will say “Please enable Javascript” while installing each patch. This is a known bug, but does not affect your install.
Locate your Config.WTF / RunOnce.WTF File
Application->Wine->Explore C:\ then “Program Files->World of Warcraft->WTF”
Right-Click and “Edit in Text Editor”
Make the following changes: (Edit the line that exists or create new)
SET ffxNetherWorld “0”
SET gxAPI “OpenGL”
SET ffxGlow “0”
SET gxWindow “1”’
SET gxRefresh “??” (This should be the Refresh Rate of your monitor used by Ubuntu.)
Choose One: (Not both)
SET gxMaximize “0” (Maximize Windowed Mode.)
SET gxResolution “1024x768” (1024x768 is the size it boots, regardless of monitor.)
If any of the previous lines do not exist, CREATE them. All three MUST be in your Config.WTF (RunOnce.WTF) for w0w to run properly (to start)
If this is your first time running WotLK (and all patches are complete), load the program, and exit the program. The RunOnce.WTF will have been replaced by the Config.WTF
Run World of Warcraft
Applications -> Wine -> Folders -> World of Warcraft -> Warcraft Launcher.exe
Exit World of Warcraft. Do NOTHING else. Just exit.
Re-Configure Wine and Warcraft to support each other
This step required for ATI video cards. Optional for a small fps boost on Nvidia video cards.
Open a Terminal: (Applications --> Accessories --> Terminal
Type command: regedit
If this does not work, or gives an error, Windows may need to renistalled on the system.
Find HKEY_CURRENT_USER\Software\Wine\
Highlight the wine folder in the left hand pane by left clicking on it. The icon should change to an open folder.
Click right on the wine folder and select [NEW] then [KEY].
Replace the text "New Key #1" with OpenGL (CaSe Sensitive).
Right click in the right hand pane and select [NEW] then [String Value].
Replace "New Value #1" with "DisabledExtensions" (CaSe sensitive).
Then double click anywhere on the line, a dialog box will open.
In the value field type "GL_ARB_vertex_buffer_object" (without the quotes).
If any of the previous steps are not performed, World of Warcraft will not function on ATI video cards. As soon as one bit of text hits your screen then you are in trouble.
This step required for ATI video cards. It is not recommended for Nvidia Video cards
Download the out of date Addon “ApplyToForeHead”. Place it in your Addons folder as you normally would.
Applications -> Wine -> Explore C:\
Program Files -> World of Warcraft -> Interface -> Addons
Run World of Warcraft
Applications -> Wine -> Folders -> World of Warcraft -> Warcraft Launcher.exe
ATI Video Cards:
Enable the Out of Date Addon ‘ApplyToForeHead’ that you previously downloaded and installed.
Login to play-test Warcraft by going inside and outside of buildings, getting in at least one fight, reading your quest-log, and texting in chat.
Everything should be functioning normally except your sound might suck.
If there are no errors, everything has been done perfectly! Go get the rest of your AddOns and install them, but don’t get rid of ‘AppyToForehead’.
Exit game.
WoW Ubuntu 3.1 Guide - Step 3: Installing and Configuring Wine
Fjork — Mon, 04/20/2009 - 08:12
Step 3: Installing and Configuring Wine
Install Wine
http://www.winehq.org/download/deb
Wine is a program for Linux that accurately runs windows-intended programs on Linux operating systems.
Follow the instructions listed under the link explicitly. This will ensure your version of Wine is not only always up to date, but safest.
Wine will now be ‘hidden’ in your files. Because wine installs itself usually under “ $ /usr/local/bin/.wine/ and Ubuntu doesn’t really read files that have /. / in the file name.
If you wish to open Wine. Applications -> Wine -> Winecfg
I know I'm missing a step here. Please comment if you remember what I forgot.
Reboot system.
Turn off Desk Effects
System->Preferences-> Appearance
Turn off the “special effects”. This is the last tab. Select “None”.
Reboot system.
WoW Ubuntu 3.1 Guide - Step 2: Installing and Configuring Ubuntu
Fjork — Mon, 04/20/2009 - 08:10
Step 2: Installing and Configuring Ubuntu
Install Ubuntu
You will be asked for a username and password. This will be the "root" user and your user. (sudo = root when you are typing in terminal mode)
*Note* You should create a secondary account for w0w playing as there are no system protections when you are accessing interwebz programs such as video games, online poker, etc through the root login. This can be done from the Virtual Terminal or the gui. This should be done after you have everything configured and have play-tested World of Warcraft to your satisfaction. However, unfortunately, you’ll then have to configure and play-test AGAIN for the new user.
From Gui, Systems->Administrator-> User Groups
From Virtual Terminal (Ctrl + Alt + F1)
sudo adduser username
Follow prompts.
From the Gui, you will have to select “root” (which is greyed out) and click ‘Unlock’ before it will allow you to Add a user. Each user must be configured separately.
Update Ubuntu
Currently for 8.10 there are 289 Updates to have installed before you start configuring your machine. DO THIS FIRST.
You will need to be connected to the internet to do this. Picture your “Start Menu” as being on the top instead of the bottom of the page. See the Network Button on the top-right? Configure it.
Check Mozilla FireFox to make sure you have Internet.
If you do, there should be a red and white arrow pointed down next to your network status icon. Click it.
Install all updates.
This can also be done through: System -> Administration -> Update Manager
Reboot system.
How do I determine my Video Card make and model?
Open a Terminal.
Applications -> -> Terminal
Type the following:
lspci | grep VGA
*Note* If the grep returns two video cards, you need to determine which one is your on-board video card. Sometimes if the cards are from the same manufacturer, they will conflict and you will need to turn off your on-board card in the BIOS. If you are not sure how to do that, either do some forum-crawling or send me a PM on the site.
Installing ATI Video Card Drivers
System -> Administration -> Hardware drivers
Select “ATI Driver” Should be listed as Proprietary and approved by Ubuntu.
Please ensure the Driver you have selected is the “Catalyst 9.3”. If Linux does not support you with this driver, it should be downloaded to your desktop and manually installed.
The ATI Drivers only support video cards series 2400 and greater.
Select “Enable this Driver”.
Reboot system.
*Note* Many times the graphic-rendering is choppy and can lag using the Default ATI Proprietary Drivers submitted through Ubuntu because they do not install properly. If this is the case, please follow the next instructions (I had to do this on my ATI Radeon Mobility 3450).
Source: http://wiki.cchtml.com/index.php/Ubuntu_Intrepid_Installation_Guide
*Note* If you are using a 64-bit system, please follow the instructions on the website directly, but read the entire site before beginning. There is more end-user configuration required.
Text in green should be entered in Terminal.
Open a Terminal: (Applications -> -> Terminal)
1. Install the necessary programs
sudo apt-get install build-essential cdbs fakeroot dh-make debhelper debconf libstdc++5 dkms
Download page: Catalyst 9.4. This package contains both the 32-bit and 64-bit driver.
Ensure your terminal is set for the folder the package downloaded in. (aka: $ cd Desktop)
2. Create .deb packages.
sudo sh ati-driver-installer-9.4-x86.x86_64.run –buildpkg Ubuntu/intrepid
3. Install .debs.
sudo dpkg -i xorg-driver-fglrx_8.602-0ubuntu1_i386.deb fglrx-kernel-source_8.602-0ubuntu1_i386.deb fglrx-amdcccle_8.602-0ubuntu1_i386.deb
4. Finish the Installation and Configure
sudo gedit /etc/X11/xorg.conf
A window will pop-up with your .conf file. Locate the “Device” section.
If the following line is not in the “Device” Section, add it.
Driver "fglrx"
Save file and exit. Return to your Terminal.
sudo aticonfig –initial –f
Exit terminal. Reboot computer.
Installing Nvidia Video Card Drivers
System -> Administration -> Hardware drivers
Select “Nvidia Driver 180” Should be listed as Proprietary and approved by Ubuntu.
The Nvidia Drivers only support video cards
Roughly GeForce 5100 and greater.
Roughly Quadro NVS 290 and greater.
Check here if you are not sure if your care is supported
Select “Enable this Driver”.
Reboot system.
WoW Ubuntu 3.1 Guide - Step 1: Planning and Setup
Fjork — Mon, 04/20/2009 - 08:08
Step 1: Planning and Setup
Lower ALL of your World of Warcraft settings to minimum. Archive all AddOns then remove them. Archive all the Patches you have, we might need them. (The usefulness of this comes in later.)
Backup ALL files to burned CD and/or Flash Drive. We are going to attempt to keep all of your Windows Files (including Warcraft), but life isn’t always fair, is it?
Get your copy of Ubuntu. You can download it (along with a iso burner program) straight from http://www.ubuntu.com or if you prefer, you can purchase a cd to be sent to you for a few bucks (the cost of the cd. The software is free.)
Make a copy of your Ubuntu install cd. (Mine was picked up by my toddler and shoved into the fireplace grating. The backup is free (with an “Image Burner”), and good to have.
https://help.ubuntu.com/community/BurningIsoHowto
Read this if you have already gotten lost:
https://help.ubuntu.com/community/SwitchingToUbuntu/FromWindows
Don’t read to long, or you’ll stay lost. I’m walking you through.
BootFromCD
https://help.ubuntu.com/community/BootFromCD
Here we are actually going to be booting Ubuntu from the CD. You have the option of exploring Ubuntu, or installing it. We are going to choose install.
Migration Assistant (informational)
https://help.ubuntu.com/community/SwitchingToUbuntu/FromWindows/TransferringFilesAndSettings
https://help.ubuntu.com/community/MountingWindowsPartitions
You can do that, but I’ll tell you now it’s possible to setup a dual-boot, in which case all your Windows files will be preserved and Ubuntu will usually show them all in your files.
WoW Ubuntu 3.1 Guide
Fjork — Sun, 04/19/2009 - 21:03
All suggestions are welcome as this will be an evolving document.
This will be a book page as Garreth, myself, Grasen, Aidin, and Delirium are done tearing it apart (and it will look nicer.)
All information provided has been referenced by the sources referenced through the document and as can be seen I can confirm that they work. These instructions are for Ubuntu 8.10 Intrepid, however they should work fine with Ubuntu 9.04 after release. I might play-test and find out.
Something rarely mentioned by people who support OpenSource is the large amount of End-User work (that’s you) it takes to make a Linux-based system function the way you want it to. If you do not consider yourself at least ‘moderately’ tech-savvy, take a long moment to consider your options before making the conversion to Ubuntu. (aka, if the following words mean nothing to you, Ubuntu isn’t for you unless you have guild/family/friends to help. ‘Mozilla’, ‘Torrent’, ‘manual install’, ‘drivers’, ‘dual-boot’, ‘regedit’, ‘refresh rate’. Not all of them, but if you’re looking at one of the seven than Ubuntu probably isn’t for you.)
*Note* Currently Blizzard does not support Mouse-Hardware properly while using OpenGL. In Windows when your system lags, your mouse does not. In Linux, your mouse will lag when your system lags. (aka: Wintergrasp, 25man Raiding, Malygos, etc) Please visit the Macro’s and Recommended AddOns page for more information and suggestions.
If you see something wrong, PLEASE post!
This is the Linux x86 and Linux x86_64 Drivers Released 03/24/2009
ATI has recently developed the Catalyst software support for Linux and it is very much appreciated but is not quite enough to work perfectly right off the bat.
The ATI Drivers only support video cards series 2400 and greater. If you have an ATI card prior to series 2400 DO NOT GO FURTHER.
This is WineHQ 's World of Warcraft page. Most of the information below will be coming directly from this page.
Please read this section for a quick overview before commending on ‘issues’ that might be unable to be corrected. (aka: mini-map is white while indoors, mouse-lag, etc)
http://www.wowwiki.com/Wine
Wowwiki's Wine Page
http://www.wowwiki.com/Wine_miscellaneous_info
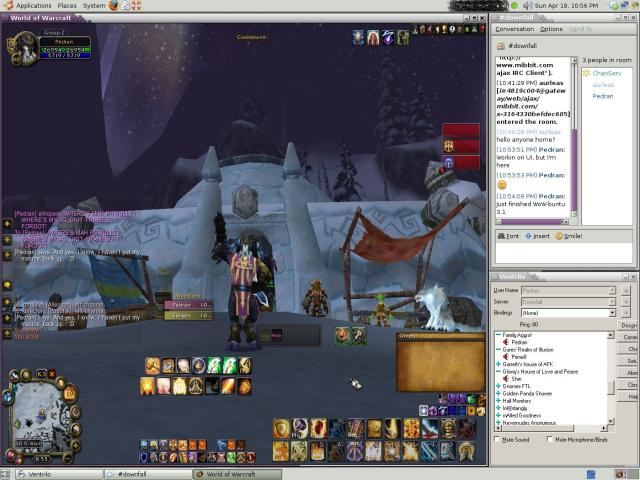 Wow-Buntu 3.1 ScreenShot: Where's Pitbull?
Table of Contents
Step 1: Planning and Setup
Step 2: Installing and Configuring Ubuntu
Step 3: Installing and Configuring Wine
Step 4: Installing and Configuring
Step 5: Installing and Configuring Sound / Ventrilo
(Under Future Construction because Garreth ran me through it to fast and I don’t remember what he made me do……)
Step 6: Macro’s and Recommended AddOns
(Under Future Construction because to be frank, I’m a Tankadin and don’t need that wide a variety of macro’s.)
Step 7: Troubleshooting and current known issues
(Under Future Construction. I am not a Linux/Ubuntu guru. I learned everything and setup my system over a period of three days.)
08 - Hodir Strategy Guide
saedo — Sat, 04/18/2009 - 15:26
 Health:
- Heroic: 32M
- Normal: 8.4M
- 8 minute enrage
Abilities:
- Biting Cold: Deals increasing periodic damage to stationary enemies. Movement diminishes this effect. This aura uses the same mechanics as Intense Cold during the fight against Keristrasza in the Nexus, it stacks up and damage increases over time. Moving or staying near a Toasty Fire will lower the amount of stack.
- Flash Freeze: Encases the target in a block of ice. This spell will freeze the entire raid in blocks of ice, you can avoid this spell by standing on Sspawned by Icicle. 9 sec cast, 30 sec cooldown
- Freeze: Inflicts 5550 to 6450 Frost damage to nearby enemies, immobilizing them for up to 10 sec. 10 yd radius. The root effect of this spell is dispellable.
- Icicle: Icicles will randomly drop on the ground during the fight. Move before they hit the ground, they will deal 12,000 damage on impact. After an Icicle crashed on the ground it will create a Snowdrift, standing on it will protect you from the effects of Flash Freeze.
- Frozen Blows- Reduces Hodir's physical damage by 70%, but grants each of his attacks 31,062 (Heroic: 40,000) additional Frost damage, for 20 seconds. Enemies take 4,000 additional Frost damage every 2 seconds for the duration of the spell.
NPCs:
There will be 8 friendly (4 in normal) NPCs that we can release to help with the fight. They start off in ice blocks to attack to release. Not absolutely neccessarly, but they do dps themselves and buffs, and help dispels too. Also don't release them before Hodir is pulled or they despawn for the fight.
Moonkins:
- Starlight: Envelops a location in starlight for 1 min, increasing the attack and casting speed of friendly units within it
Shamans:
- Storm Power: Charges a nearby friendly target with lightning, increasing critical strike damage by 135% for 30 sec.
Priests:
- Dispel: Dispell Priests will randomly dispell Freeze on the members of the raid.
Mages:
- Toasty Fire: Warms nearby friendly creatures, preventing the effects of Freeze and Biting Cold, and increasing Spirit by 4. In addition, your Spells and Ranged attacks have a chance to singe enemies. Toasty fire can be extinguished by falling ice or Flash Freeze.
- Singed: Singes the enemy, inflicting 3000 Fire damage and increasing damage taken from magical spells and effects by 2% for 25 sec. Stacks up to 30 times.
Hard Mode:
Kill him in 3 mins or less.
The Fight:
This is a fairly simple fight actually. First note, only need 1 tank, and a Nuitbear in polar Frost Resist gear with 50K hp would be perfect tank for this. Other tanks are doable too, don't need Frost Resist per se, with enough HP at least. It's only that 40K frost damage blow which can probably be reduced with CDs like Sarth3D breath coordination type of thing.
Most of the raid damage is avoidable. The better we're at avoiding, the less healers we need for the fight.
Jump/run all the time to avoid the dot from stacking, like Nexus. Avoid the Icicles that fall from the sky, watch for the snowflakes, think Gruul rocks. Turn on your projected textures, these icicles are the blue circles on the ground you have to stay away from.
For Flash Freeze, can completely avoid it by being where Icicles already landed, they form Snowdrifts. During it's cast, 3 large icicles (2 in Normal) will start to drop. Get near one of these, just outside of it until the snowdrift forms, then strafe on it. If one should fail to avoid this, they will be encased in an Ice Block. That's when we have to hit the Ice Block to release him, should they be hit with Flash Freeze again while in a block, they die.
As for the NPCs, if we choose to work with them, we gotta release em from the Ice Blocks. They give us buffs, they help dispels, they even dps the boss. They are also vulnerable to Flash Freeze and not as smart as some of us. So we'd likely have to release them each time if we want to keep them around.
That's basically it, 8 minute enrage. Use the lights, use the fires, dps boss, avoid icicles, never stop moving, get on snowdrifts, profit. Loot wise, he has 2 chests. He destroys one at hard mode, one at enrage. So Hard Mode is just killing him very fast for more loots.
Achievements:
Cheese the Freeze: Defeat Hodir without any raid member being hit by Flash Freeze on Normal/Heroic Difficulty
Just a raid wide check to avoid damage.
I Have the Coolest Friends: Defeat Hodir without any friendly NPC dying on Normal/Heroic Difficulty.
This simply means we hit every single damn ice block to break everyone out after each Flash Freeze. They won't die to anything else except the insta kill flash freeze while ice blocked. Remember 8 in Heroic, 4 in Normal.
Getting Cold in Here: Defeat Hodir without any raid member having more than 2 stacks of Biting Cold on Normal/Heroic Difficulty.
Another raid check to keep moving. And quick dispels when people get trapped by frost nova.
Staying Buffed All Winter: Possess the effects of Toasty Fire, Storm Power and Starlight at the same time on Normal/Heroic Difficulty.
This might take a bit of luck. Got mine's purely by accident along with a few others. You'd need a Starlight by a fire, and have the Shaman buff you. Though I dunno how he chooses his targets to buff.
I Could Say this Cache was Rare: Defeat Hodir before he shatters his rare cache on Normal/Heroic Difficulty
Hard Mode. It's simply a defeat him within 3 mins. On 10 man, we did this 2 healers, pretty much blind zerg of the boss. Release the ice blocks of course, and take advantage of buffs whenever you can. DPS!
Trash Info:
Champion of Hodir: Single pulls, simply a big guy, has a targetted aoe breath where it freezes anyone it hits in an ice block. Like that mage deep freeze kinda ice block though. Think of it like those SSC bog lord that pick a member to spit poison at, and hits everyone inbetween. Except it's ice, and it's too late if you're already hit. Just spread out and circle around him, to mitigate the number of people hit each time.
Snowdrifts: There'll be these steaming piles of snow. When you approach em, Worms pop out. Lots of them. And one by one. So yea, aggro can be touchy since they don't all appear at once to tank and build threat.
Elemental Packs: There will be one big Revanant and 4 smaller Ice Rock Elementals. The big guy puts a shield on everyone that reduces AoE damage by 90%. What? Is Blizz trying to say we can't aoe these? Anyways, obviously, kill the big guy, then ezmode trash.
Videos:
10 man Hard Mode
25 Man Hard Mode
Sources:
- http://www.mmo-champion.com/index.php?page=848
- http://www.wowwiki.com/Hodir_(tactics)
- http://www.stratfu.com/strats/Hodir
09 - Thorim Strategy Guide
saedo — Sat, 04/18/2009 - 14:17
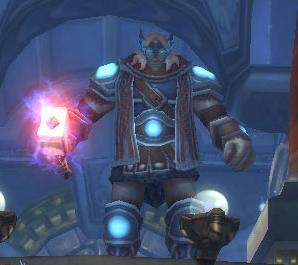 Health:
- Heroic: 20M (Hard mode)
The Fight and Abilities:
This fight is a bit more, hectic, so I'll list abilities of the adds as they appear as I go along.
Gist of it, a gauntlet arena. Adds come, we kill. Then akin to Gothik, raid must be split up with part dealing with adds, part dealing with Thorim himself.
Phase 1:
Thorim is practically immune to damage so don't bother attack him. He will be attacking us though.
- Stormhammer: Throws a stormhammer, dealing 2451 to 2551 damage to an enemy, knocking down and stunning the target for 2 sec, and causing a deafening thunderclap to all enemies nearby the target. 100 yd range, 0.5 sec cast
- Deafening Thunder: Inflicts 4625 to 5375 Nature damage to enemies standing in close proximity to a Stormhammer strike, increasing spell casting times by 75% for 8 sec. 50000 yd range, Instant
- Charge Orb: Charges a nearby orb with electricity. Causes Lightning Shock - Inflicts 2831 to 3169 Nature damage on a nearby enemy.
- Berserk: Empowers allies with the full might of Thorim. This spell will increase damage done by the adds by 500%, casting speed by 200%, and their health by 300%. This is an enrage ability casted on all the adds if players take more than 5 minutes to reach Thorim at the top of the Arena.
What we will be dealing with first are Jormungar Behemoth and Captured Horde (or Alliance if you're Horde). They shouldn't be too hard to deal with.
Jormungar Behemoth:
- Acid Breath: Spews acidic bile at a target and nearby enemies, inflicting 12000 Nature damage and 1500 additional damage every 2 sec. for 18 sec. 50 yd range, 1 sec cast
Captured Mercenary Captain:
- Devastate: Sunder the target's armor causing the Sunder Armor effect. In addition, causes 50% of weapon damage plus 90 for each application of Sunder Armor on the target. The Sunder Armor effect can stack up to 5 times.
- Heroic Strike: A strong attack that deals 3938 to 5062 additional Physical damage
Captured Mercenary Soldier:
- Barbed Shot: Fires an arrow that pierces an enemy's flesh, inflicting 4513 to 4987 Physical damage and causing 500 damage per 3 sec. for 12 sec. 45 yd range
Kill em all.
Phase 2a: Constructs
The constructs of all types (healer, casters, melee) from the stands all jump into the ring and this is where we have to split the raid to deal with them.
Dark Rune Acolyte:
- Greater Heal: Calls upon Holy magic to heal an ally for 94500 to 115500 Health. 40 yd range, 2 sec cast
- Smite: Smites an enemy, inflicting 7650 to 9350 Holy damage. 50 yd range, 1.5 sec cast
Dark Rune Champion:
- Whirlwind: Attacks nearby enemies in a whirlwind of steel that lasts 2 sec. and inflicts normal damage plus 50.
- Mortal Strike: Inflicts 250% weapon damage and leaves the target wounded, reducing the effectiveness of any healing by 50% for 5 sec
- Charge: Charges an enemy, inflicting normal damage plus 75 and stuns the opponent for 2 sec. 8-25 yd range
Dark Rune Commoner:
- Low Blow: Lands a cheap shot on an enemy, inflicting Physical damage and reducing the target's damage dealt by 3% for 20 sec. 5 yd range, Instant
Dark Rune Evoker:
- Runic Lightning: Strikes an enemy with a blast of runic lightning, inflicting 7875 to 10125 Nature damage. 150 Mana, 45 yd range, 1.5 sec cast
- Runic Mending: Heals an ally for 18500 to 21500, then heals for an additional 6000 every 1 sec. for 15 sec. 280 Mana, 40 yd range, 2 sec cast
- Runic Shield: Surrounds the caster with a runic barrier, absorbing 120000 magical damage and reducing all Physical damage taken by 50%. 330 Mana, 30 yd range, 0.5 sec cast, 6 sec cooldown
Dark Rune Warbringer:
- Aura of Celerity: Increases nearby allies' melee, ranged, and casting speed by 20%. Instant
- Runic Strike: Strikes at an enemy with an electrified weapon, inflicting Nature damage equal to weapon damage plus 1000. 5 yd range, Next melee
Iron Honor Guard:
- Cleave: Inflicts 150% of normal melee damage to an enemy and its nearest ally.
- Shield Smash: Inflicts 7400 to 8600 Physical damage to an enemy, stunning it for 3 sec.
- Hamstring: Inflicts 50% weapon damage to an enemy, reducing its movement speed by 60% for 5 sec
Titanium Stormlord:
- Cyclone: Attacks nearby enemies in a whirlwind that inflicts 100% weapon damage as Nature damage.
Again the raid must split up, remember you only had 5 minutes to reach Thorim. Part of the raid stays behind dealing with the above adds, the other part head to....
Phase 2b: Tunnel
So this part of the raid is the task force assigned to reach Thorim and force him into the arena.
There are adds here too to deal with. And the first mini boss is similar to the pinnacle gauntlet, he'll light up one half of the room with fire you just gotta stay out of. Watch which of his hands are raised.
Dark Rune Thunderer:
- Lightning Brand: Shocks the target for 3500 Nature damage to the target, and increases Nature damage taken by 40% for 20 sec. 8 yd range, Instant
Iron Ring Guard:
- Impale: Deals a vicious attack that causes the target to bleed profusely until healed past 90% of its maximum health. Deals 1750 damage every 2 sec. for 1 min or until removed via healing. 5 yd range, Instant
- Ravage Armor: Reduces the target's armor by 5%. 8 yd range, stacks up to 20.
- Whirling Tip: Knocks down nearby enemies, stunning them for 2 sec. and inflicting increased weapon damage.
Runic Colossus (Mini-Boss):
- Charge: Charges an enemy, inflicting 6938 to 8062 Physical damage and knocking the enemy back. 8-40 yd range, Instant
- Runic Barrier: A shield of runic power surrounds the caster, reducing all damage taken by 50% and inflicting 2000 Arcane damage to attackers. Instant
- Smash: Deals 37000 to 43000 Physical damage to all enemies within a 10 yard cone in front of the caster. 3 sec cast, 2 sec cooldown
Ancient Rune Giant (Mini-Boss):
- Rune Detonation: Immobilizes a target with a runic ward that detonates after 4 sec to inflict 11250 to 13750 Fire damage around the target. 60 yd range, Instant
- Stomp: Inflicts 12250 to 15750 Physical damage to nearby enemies and knocks them back. 10 yd range, Instant
Reaching the top of the arena at the end of the Hallway he'll jump into the Arena where the first part of the raid is.
Phase 3: Thorim
- Touch of Domination: Subjugates the target to the will of Yogg-Saron, weakening it yet conferring a subtle control. Reduces Thorim's health and damage by 25% if the raid reaches him after the 3 minutes hard mode timer.
- Chain Lightning: Strikes an enemy with a blast of lightning that inflicts 3700 to 4300 Nature damage. The bolt will arc to additional nearby enemies, inflicting 100% more Nature damage to each successive target. 150 Mana, 100 yd range, 0.5 sec cast
- Lightning Charge: Absorbs a torrent of electrical energy, inflicting Nature damage to enemies in a cone between the caster and the power source, and increasing the caster's melee damage and attack speed by 15%, and Nature damage dealt by 10%. 100 yd range, Instant
- Lightning Charge: Absorbs a torrent of electrical energy, inflicting 13875 to 16125 Nature damage to enemies in a cone between the caster and the power source. 150 yd range, Instant
- Unbalancing Strike: Inflicts 200% weapon damage and leaves the target unbalanced, reducing their defense skill by 200 for 15 sec. 8 yd range, Instant
DPS race at this point. Spread out for lightning. A move that kinda sounds like the 2nd Occulus boss where he charges up and lights an entire section. Anyways, kill before his damage gets too high. Maybe switch tanks for Unbalancing Strike.
Fight Summary:
Because that was a lot to take in, I'll reiterate the keys of the fight.
- Kill the giant worm and the soldiers
- Raid splits up, in 10 man we did a 4 in the tunnel, 6 remained. 25 man used 15 and 10.
- Arena Group stays and deals with adds, killing em.
- Hallway Group opens lever, enters a gauntlet, watch the Colossus' arm to know which half of the hall to avoid, he'll light it up
- Kill the Colossus, go up stairs, another miniboss, turns you into bombs, but roots you so raid has to run from you
- Then it's clear sailing to reach Thorim, watch timers if you want to attempt/avoid Hard Mode. It was actually quite easy and we reached him at about 2.5 min so took a bit of a wait.
- Jump into the arena with Thorim, finish off the adds, spread out, kill him.
Hard Mode:
To reach hard mode, we reach Thorim in 3 mins or less. Not only does he have 25% more damage and health, Sif will be around. Can't kill her, but she'll be attacking us, so more damage all around.
- Frostbolt Volley: Inflicts 9000 to 11000 Frost damage to nearby enemies, reducing their movement speed by 50% for 4 sec.
- Frost Nova: Inflicts 9425 to 10575 Frost damage to nearby enemies, immobilizing them for up to 6 sec. 2.5 sec cast
- Blizzard: A rain of ice moves around the room, dealing 3282 to 4218 Frost damage every 1 sec. for 10 sec. and lowering the movement speed by 65%.
Our Positioning:
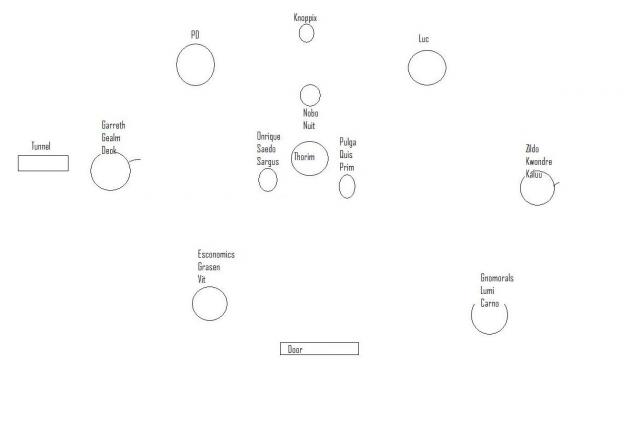 Thorim Positioning
Achievements:
Don't Stand in the Lightning - Defeat Thorim without any raid member being struck by Lightning Charge on Normal/Heroic Difficulty.
Raid check, watch the orbs around the room, don't be on the side of an active one. It's a little lightning trail the goes from Thorim to an orb. Move.
I'll Take you all On - Defeat Thorim, the Ancient Rune Giant and the Rune Colossus on Normal/Heroic Difficulty
From the words it seems to mean you were part of the Hallway group. Would have to simply rotate people to do it for this one. But atm, it seems it doesn't seems to complete regardless, so just a normal defeat of Thorim.
Who Needs Bloodlust - Defeat Thorim while under the effect of Aura of Celerity on Normal/Heroic Difficulty.
This aura comes from the mob, a Warbringer. What has to be done is a priest must MC one, pretty much at least during Thorim phase itself. Apparently this is party based, so need a priest for each party, or have to rotate each week.
Siffed - Force Thorim to enter the arena while Sif is present on Normal/Heroic Difficulty.
This is just activating Hard Mode, reach him within 3 mins. Quite easy since you don't even have to beat him.
Lose Your Illusion - Defeat Thorim while Sif is present on Normal/Heroic Difficulty.
The real Hard Mode. This is where you actually have to defeat Thorim. Basically more HP, more damage, and Sif is also throwing frost spells at the raid, slowing the raid members. Dispels will be needed for frost novas incase the aoe is on their side as well. As a note, the Lightning Charge is pretty lethal here, probably one shots you. Unlike ezmode where it's survivable damage....
Trash Info:
Vykrul Packs: They come in pairs and there's only 2 of them. The Thunderer just does damage, nature hits mostly, not very threatening. The Ravager sunders armor, a lot, able to reduce Nuitbear to zero armor with enough stacks. 10% per stack? Anyways, this means the tanks might want to trade off once they get too many. Or, just try to zerg the Ravager down fast. Very fast before the tank bites it.
Sources:
10 - Freya Strategy Guide
saedo — Sat, 04/18/2009 - 13:05
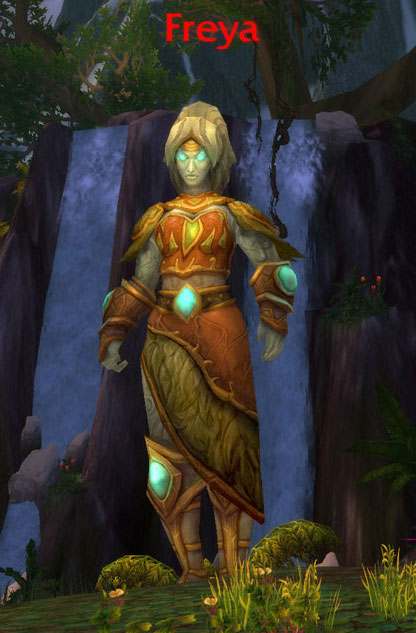 Health:
- Heroic: 4.2M
- Normal: 1.4M
Abilities:
- Touch of Eonar: The pressence of the Lifebinder heals Freya for 24000 health every 1 sec. Instant
- Attuned to Nature: Increases healing received by 4%. She starts the fight with 150 stacks of this buff (for a total of 600% extra healing). Killing the adds spawned throughout the fight will lower the stack count.
- Killing the Ancient Conservator removes 25 Stacks
- Killing an Ancient Water Spirit, a Storm Lasher, or a Snaplasher removes 10 Stacks
- Killing a Detonating Lasher removes 2 Stacks
- Sunbeam: Inflicts 7400 to 8600 Nature damage to enemies within 8 yards of the target. This effect will affect players. AND The rays of the sun heals the plant life for 10000 damage every 1 sec. This effect will affect monsters.
- Summon Lifebinder's Gift: Somewhere within 60 yards of Freya, a Lifebinder's Gift is summoned, which is a non-mobile, non-attacking mob with ?k HP (37k on Normal). This mob emotes 'Lifebinder's Gift begins to grow!' as it is summoned. It continues growing for about 15 seconds. If it is not killed in that time, it performs a powerful heal
- Seedling Ability: After Freya summons six packs of adds and her stack of Attuned to Nature buffs dissipates, she will stop spawning them and instead use this ability. Seedlings are thrown on the ground which explode a few seconds later, dealing damage and knocking nearby characters up into the air.
Detonating Lashers:
- Flame Lash: The Lasher inflicts Fire damage equal to 150% of their melee damage. 4% of base mana, 5 yd range, Instant cast
- Detonate: The Detonate inflicts 6825 to 7175 Fire damage to enemies within 15 yards. Instant
Ancient Water Spirit, Storm Lasher, Snaplasher:
Ancient Water Spirit:
- Tidal Wave: Surge through enemies in a line. Deals inflicts 5700 to 6300 Nature damage knocking them back.
Storm Lasher:
- Hardened Bark: Attacks made against the Lasher trigger the protective bark to grow, increasing damage by 10% and slowing move speed by 5%. Lasts 4 sec, stacks up to 99.
Snaplasher:
- Stormbolt: Inflicts 8788 to 10212 damage to an enemy. 40 yd range, 1.5 sec cast
- Lightning Lash: Deals about 7500 (5500 on Normal) damage to a target and chains, increasing its damage, to 4 successive targets (2 on Normal). 2 second cast.
Ancient Conservator:
- Nature's Fury: Infects an enemy for 10 sec, causing it to inflict 5550 to 6450 Nature damage to its nearby allies every 2 sec.
- Conservator's Grip: The grip of the Protector prevents attacking and casting spells. This can be cancelled by staying under the mushrooms while the Conservator is here, this will also buff your damage by 25%
The Elders:
This fight has a similar mechanic to Sarth3D with 3 Elders now to kill before Freya if we want easy mode. 4.46M hp each in Heroic.
Elder Brightleaf:
- Unstable Sun Beam: Increases damage and healing done by 5% until the energy of the beam collapses. Stacks up to 10 times.
- Unstable Energy: Inflicts 16650 to 19350 Nature damage and cancels the effects of Unstable Sun Beam.
- Photosynthesis: The rays of the sun heals the plant life for 10000 damage every 1 sec.
- Solar Flare: Inflicts 12950 to 15050 Fire damage to a number of targets based on Brightleaf Flux.
- Brightleaf Flux - Positive: Damage and healing from spells and effects is increased by 10%.
- Brightleaf Flux - Negative: Damage and healing from spells and effects is reduced by 10%.
Elder Ironbranch:
- Impale: Stuns and inflicts 32375 to 37625 Physical damage every 1 sec for 5 sec. 5 yd range
- Iron Roots: The grip of the Iron Roots inflicts 7863 to 9137 Nature damage every 2 sec and roots the target until freed. If the Iron Roots surrounding the targets are killed, the target will be released. 50000 yd range, Instant
- Thorn Swarm: Inflicts 12488 to 14512 Nature damage to enemies within 6 yards of the target
Elder Stonebark:
- Ground Tremor: Deals 11400 to 12600 Physical damage to enemies within 100 yards, interrupting any spells being cast for 8 sec
- Fists of Stone: The stone fists slow the caster's move speed by 20% and increase damage dealt by 250%. In addition the devastating attacks have a chance to break the bones of the target, reducing chance to block, dodge, or parry by 100% for 20 sec.
- Petrified Bark: Melee attacks and abilities will be reflected for 30 sec. 220 charges. (80 in 10-Man)
Hard Mode:
Leaving all Elders up is hard mode, granting Freya and all adds buffs.
- Brightleaf's Essence: The essence of Elder Brightleaf increases Magic damage dealt by Freya and her Allies of Nature by 50%. 50000 yd range, Instant; Grants Freya Unstable Sunbeam
- Stonebark's Essence: The essence of Elder Stonebark increases physical damage dealt by Freya by 50%. 50000 yd range, Instant; Grants Freya Ground Tremor
- Ironbark's Essence: The essence of Elder Ironbranch increases Physical damage dealt by Allies of Nature by 50%. 50000 yd range, Instant; Grants Freya Iron Roots
The Fight:
This fight is pretty much all about adds. First off, if we do easy mode, we clear all the Elders (and trash) around the Conservatory. Similar to Sarth3D, each have their own little abilities, but should pose no problems on their own.
Brightleaf: Lasers pew pew
Stonebark: Heal the impaled, break people out of roots
Ironbark: Don't cast during Ground Tremor or you get silenced. Might need to switch tanks for Fists of Stone. Kite taunt if neccessary. Don't kill yourself during petrified bark, that reflects physical damage.
For Freya herself, adds. First thing of note she has a self healing her for 24K per sec, which is outdps'able. But she also has a stacked buff that increases her healing by 4% per stack, and she starts at 150 stacks, so 600% healing at the start. Now that we can't dps through.
The trick is, she summons adds, and each add we kill, it reduces the stack by certain amounts. So basically until we pass the first few waves of adds, we won't be able to do much damage to her.
First add of note is the Lifebinder's Gift, those must be killed within 15 seconds or it'll pull off a big heal on everything. Stop em.
Next thing are the add waves. They come in 3 flavors, Lashers, Elementals, and Conservators. They spawn in a random order, but always appearing in one of the 3, but never 2 in a row if you get this meaning. Think of it like the Mage boss in Occulus, 3 types of waves, and he will always summon 1 of each, random order. But with Freya, after the 3rd one, it randomizes for the next set, but still never 2 of the same type in a row.
The first one comes about 15 seconds into the fight, then 60 seconds afterwards. Adds are the priority.
Lashers: 12 of them spawn around Freya, they have random aggro, they'll be all over the raid, they also blow up on death. So mass aoe is likely to get people killed. Suggested courses of action are to do some aoe, then switch over to single target to handle the explosions one by one.
Elementals: A set of 3 elementals spawn, and they must be killed simultaenously (within 10 sec). 2 of them can be tanked. Water Spirit charges and knocks ppl back. Storm Lasher can be kicked and all, do so cause his chain lightning has the usual pattern of doing more damage the more it chains through. Stonelasher though is likely not tankable, well he is, but each hit done to him will buff him to do more damage. But it also slows him down til he stops altogether. Ranged kite him til that occurs, it is safe for melee to attack so long as threat is below the ranged tank.
Conservators: Only 1 of these will spawn at a time. Basically 2 things to be aware of, stay under the good mushrooms or you won't be able to do anything. Run the fuck away if you have the bomb (Nature's Fury).
And that's pretty much the fight. Adds come in, kill em all. Kill Freya inbetween adds. Oh and avoid lasers.
After about 6 waves, her stacks should be all taken care of, so no more of those adds at least. She'll still summon the Lifebinder so kill that before it can heal her. Also she gains new ability to sprinkle seed bombs, stay away from those.
Achievements:
Lumberjacked - Defeat Elder Brightleaf, Elder Ironbranch and Elder Stonebark within 15 seconds of each other on Normal/Heroic Difficulty.
So this sounds like we gotta pull all 3 at once and kill em together, somewhat. But they're on opposite ends of the Conservatory. If we tank em all together, we'd have to watch for Healing Beams, break people out of roots, Impales, Ground Tremor silence, etc. Or would it be a split the raid up thing and each deal with the bosses simultaneously. This sounds harder to pull off in a 10 man.
Con-speed-atory - Defeat Freya within 20 minutes of the first creature you kill in the Conservatory of Life on Normal/Heroic Difficulty.
Just a speed run. With enough gear, knowledge, and probably easy mode, this should be easy.
Deforestation - Defeat 2 Ancient Water Spirits, 2 Storm Lashers and 2 Snaplashers within 10 seconds on Normal/Heroic Difficulty.
This seems tricky, would have to offtank the 1st elemental pack until the 2nd one appears then kill em all together I believe. Probably the snaplashers should be merely hit til rooted and left alone til the 2nd one.
Getting Back to Nature - Defeat Freya while she is affected by 25 stacks of Attuned to Nature on Normal/Heroic Difficulty
This could take luck. It means leaving the last pack, possibly the last 2 packs up and kill Freya. It might be 2 cause the Lasher packs only take down 20, so if they're last and we killed the rest, Freya would only have 20 left. Then you'd be dealing with 45-50 stacks. That'd be much harder.
Knock on Wood - Defeat Freya while leaving at least 1 Elder alive on Normal/Heroic Difficulty.
Elder Ironbranch is probably easiest to leave up. He grants 50% more physical damage to the adds, which is mostly nothing. Snaplasher will hurt earlier but does that anyways. Otherwise it's just conservators, the other adds are mostly magic or whimpy physical ones.
Anyways, Freya is also granted the Strengthened Iron Roots ability. So call out who got it, everyone kill it. In normal it seems to have 16K hp to take out. You can also Cloak / Bubble / Block, and Blessing of Freedom, PvP Trinket, etc (moving impairing breakers) out of it now.
Leaving one Elder in 10 man grants you an [Emblem of Conquest] in replace of the Valor you would've gotten from the Elder himself.
Knock, Knock on Wood - Defeat Freya while leaving at least 2 Elders alive on Normal/Heroic Difficulty
We left up Stonebark for our 2nd Elder. It gives Freya the Ground Tremor, if you have boss mods, you can perfectly prepare for it. Most of the fight is relatively the same. Killing 2 on 10 man grants you a [Runed Orb].
Knock, Knock, Knock on Wood - Defeat Freya while leaving all 3 Elders alive on Normal/Heroic Difficulty
Lastly we believe Brightleaf to be the hardest for us to leave up. The lights were a bit lethal, and because we had to cautiously kill the exploding lashers, we started to fall behind whenever they came up.
On our 10 man kill, we found the fight to be very tightly tuned. It's a lot of damage, and dps has to be on the ball, so can't have many mistakes before it cascades into a wipe. A bit of an adjustment was that if we did fall behind during Lashers, it was ok to leave them running around. They aren't lethal til they explode, so we dealt with other wave if necessary first.
Trash Info:
4 Packs: They consist of a green dragon, a dryad, a tree, and a lasher. They are all probably CC'able. We slept the dragon, hex/trapped the dryad. Killed the tree, he heals, also does a Hurricane to not stand under. Lasher has Thorns so watch for the damage. Dragon can do a poison spit breath.
Flower Packs: There's a big flower and a bunch of small ones. You want to tank the small ones away from the big one, and dps it fast. The small flowers that surround it will heal him. And the big one is on a timer or something spawning more and more of them. Kill him before he does. If he does, OT the small ones and drag the big one away or vice versa and try again.
Big Guy + Dryads: Here these dryads do a bubble that heals them and is dispellable or spellstealable. But when that happens, it turns into a bomb blowing shit up. So just out dps the heals. The big one stomps or something I forget it's not much of a threat.
Sources:
- http://www.mmo-champion.com/index.php?page=846
- http://www.wowwiki.com/Freya_(tactics)
- http://www.stratfu.com/strats/Freya



Recent comments
7 hours 17 min ago
4 weeks 1 day ago
7 weeks 1 day ago
7 weeks 2 days ago
9 weeks 1 day ago
9 weeks 1 day ago
9 weeks 1 day ago
10 weeks 2 days ago
11 weeks 3 days ago
13 weeks 17 hours ago