
Tools

How to add a Blizzard Authenticator to your B-Net account
Dragon — Mon, 12/03/2012 - 22:39
With the recent announcement that all Balla guild ranks will require you to have access to the website, being a raider and have an authenticator on your account. As such this guide is here to help less technically proficient or adept people with adding an authenticator to their account.
Step 1: Go to the Blizzard website for your country. The URL in the link leads to the US version, but it should automatically change to the correct version for you when you head there.
Step 2: On the top right corner of the page there is an option to log into your account.
Step 3: Once you're logged in, click on the Account option right next to it.
Step 4: On your Account page, under your account details should be an option that lists Account Security. The first one is for your authenticator.
Step 5: If you're using an Apple or Android based smart phone, you can use the Blizzard Mobile authenticator. This option allows you to download a FREE app to your phone to add an authenticator to your account through their app service.
Step 6: Otherwise, you can buy a normal authenticator off the Blizzard store For $6.50 USD
Step 7: No matter which option you choose, you can now follow the steps that come with the authenticator in order to finish adding one to your account.
Please note, that you can selection an option that either requires you to add an authenticator code every time you log into the game or just every few weeks as long as its from the same computer. You will also need your authenticator to log into the Blizzard website from now on, especially if you need to change your account info.
If you have any other questions or concerns, please check out the Blizzard Mobile Authenticator FAQ, the Blizzard Authenticator FAQ, or leave your question here in the comments for guildies to try to answer.

Wondering how your DPS / HPS stacks up?
Scaron — Sat, 01/08/2011 - 09:28
Check this out, via World of Logs, which allows you to compare with the top players in your class and spec on a by-encounter basis (Destrolock shown here for example, click your specific spec):
http://www.worldoflogs.com/rankings/players/Baradin_Hold/Argaloth/10N/Destruction_Warlock/


Garreth Says Run "Device Doctor"
garreth — Tue, 12/15/2009 - 12:29
My last post about discovering and correcting your latency in WoW was a big hit, so here's another easy-as-hell tool we can all use to make sure we're performing optimally:
Download it and run it. Device Doctor is easy and quick and will allow you to update all those drivers that I just KNOW you're all forgetting to update. Key drivers that every WoW player should have updated are:
- Network drivers
- video card drivers
- sound drivers
- various chipset drivers
Device Doctor should discover if you're behind on any of them and allow you to one-click install them. No excuse, go update yo' shit.

Mav at his best.
Dikymo — Sun, 08/02/2009 - 21:02
Just looking through my old screens. Im sure there will be more to come.
Funny as Hell RE-Alts
Keisjaa — Fri, 06/19/2009 - 18:53
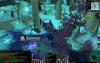
Read the chat in the lower left, Shihli has a funny moment

my clique setup
moriella — Mon, 05/25/2009 - 23:26
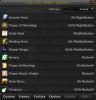
Several ppl said they wanted to see my keybinds. I have a few spells set up as keybinds, but for the most part - I use clique.
Clique is a great add on that allows you to just move your mouse pointer over a players square in grid and press a button on your mouse or a combination of keyboard + mouse to instantly cast that spell on that person.
You dont have to select anyone on grid by clicking their square, there is no need to write tons of mouseover macros for every cast on your bar
By using my right hand for mouse control and because my mouse has multiple buttons, I dont even have to press a key on the keyboard with my left hand for many casts - this allows my left hand to be doing other things like moving!
Or if I'm using a shift or alt or control button + mouse button spell thats only using my pinky finger leaving my main fingers free as well. If you are pressing 1,2,3,4 then you are using the fingers on your hand that have the most dexterity which may slow down yoru movement.
Note, my right mouse button is not bound to anything that doesnt require a key press to activate. This allows normal right mouse button useage so I can also turn/run/strafe while holding down right button - but if I'm moving with the right button pressed down my pinky can drop to the applicable shift/alt/control key and I can cast instants on the run if needed.
quartz cast timer and how it helps heal with latency
moriella — Mon, 05/25/2009 - 23:05
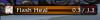
This is the latency enabled cast bar that I talked about at the very end of our healing seminar. I'll explain it just a bit
ON the right hand edge it shows my total real time lenght of cast with my current haste. It also shows my current (exact second ) latency to the server.
The latency that shows in the standard interface is an averaged latency. I was showing 92ms latency average, but at the time I fired up this cast it shows it was 189ms.
This mod calculates that 189 response time to the server and puts a red line in the cast bar. As my cast progresses, To optomize I should mash my next cast and the very moment the orange and red bar meet. This will allow your heals to go off in the lowest time possible.
When chaincasting or when there is alot of traffic to the server (a peak moment in raid) I've seen that red bar almost 50% deep. Guys this will can make a huge difference in how fast you can get your heals off and how fast you can spam heals.
I strongly recommend it for priests/pallies/shammies
Druids have so many instants it may not be worth it.
DPS - if you are chaincasting, this can really increase your dps too. Mages chaining fireballs comes to mind

WoW Ubuntu 3.1 Guide - Step 4: Installing and Configuring World of Warcraft
Fjork — Mon, 04/20/2009 - 08:16
Step 4: Installing and Configuring World of Warcraft
Open / Install Warcraft Folder in Wine
If you converted to Ubuntu on a dual-boot (didn’t format) you can actually open the World of Warcraft folder from your previous installation. I hope you did backed up all of your files and patches just in case.
If you didn’t convert, download the Install.exe for Warcraft from Blizzard (6.5 gb) and when it is done, Right-Click on it, and select “Run with Wine”.
Find some mirror sites (or archive) for the patches. Same thing for each patch. Right-Click “Run with Wine.”
*Note* If you have to install (as opposed to playing directly from installed w0w on your Windows install), you will not have a Config.WTF file, you will instead have a RunOnce.WTF file.
*Note* The Blizzard Updater will say “Please enable Javascript” while installing each patch. This is a known bug, but does not affect your install.
Locate your Config.WTF / RunOnce.WTF File
Application->Wine->Explore C:\ then “Program Files->World of Warcraft->WTF”
Right-Click and “Edit in Text Editor”
Make the following changes: (Edit the line that exists or create new)
SET ffxNetherWorld “0”
SET gxAPI “OpenGL”
SET ffxGlow “0”
SET gxWindow “1”’
SET gxRefresh “??” (This should be the Refresh Rate of your monitor used by Ubuntu.)
Choose One: (Not both)
SET gxMaximize “0” (Maximize Windowed Mode.)
SET gxResolution “1024x768” (1024x768 is the size it boots, regardless of monitor.)
If any of the previous lines do not exist, CREATE them. All three MUST be in your Config.WTF (RunOnce.WTF) for w0w to run properly (to start)
If this is your first time running WotLK (and all patches are complete), load the program, and exit the program. The RunOnce.WTF will have been replaced by the Config.WTF
Run World of Warcraft
Applications -> Wine -> Folders -> World of Warcraft -> Warcraft Launcher.exe
Exit World of Warcraft. Do NOTHING else. Just exit.
Re-Configure Wine and Warcraft to support each other
This step required for ATI video cards. Optional for a small fps boost on Nvidia video cards.
Open a Terminal: (Applications --> Accessories --> Terminal
Type command: regedit
If this does not work, or gives an error, Windows may need to renistalled on the system.
Find HKEY_CURRENT_USER\Software\Wine\
Highlight the wine folder in the left hand pane by left clicking on it. The icon should change to an open folder.
Click right on the wine folder and select [NEW] then [KEY].
Replace the text "New Key #1" with OpenGL (CaSe Sensitive).
Right click in the right hand pane and select [NEW] then [String Value].
Replace "New Value #1" with "DisabledExtensions" (CaSe sensitive).
Then double click anywhere on the line, a dialog box will open.
In the value field type "GL_ARB_vertex_buffer_object" (without the quotes).
If any of the previous steps are not performed, World of Warcraft will not function on ATI video cards. As soon as one bit of text hits your screen then you are in trouble.
This step required for ATI video cards. It is not recommended for Nvidia Video cards
Download the out of date Addon “ApplyToForeHead”. Place it in your Addons folder as you normally would.
Applications -> Wine -> Explore C:\
Program Files -> World of Warcraft -> Interface -> Addons
Run World of Warcraft
Applications -> Wine -> Folders -> World of Warcraft -> Warcraft Launcher.exe
ATI Video Cards:
Enable the Out of Date Addon ‘ApplyToForeHead’ that you previously downloaded and installed.
Login to play-test Warcraft by going inside and outside of buildings, getting in at least one fight, reading your quest-log, and texting in chat.
Everything should be functioning normally except your sound might suck.
If there are no errors, everything has been done perfectly! Go get the rest of your AddOns and install them, but don’t get rid of ‘AppyToForehead’.
Exit game.
WoW Ubuntu 3.1 Guide - Step 3: Installing and Configuring Wine
Fjork — Mon, 04/20/2009 - 08:12
Step 3: Installing and Configuring Wine
Install Wine
http://www.winehq.org/download/deb
Wine is a program for Linux that accurately runs windows-intended programs on Linux operating systems.
Follow the instructions listed under the link explicitly. This will ensure your version of Wine is not only always up to date, but safest.
Wine will now be ‘hidden’ in your files. Because wine installs itself usually under “ $ /usr/local/bin/.wine/ and Ubuntu doesn’t really read files that have /. / in the file name.
If you wish to open Wine. Applications -> Wine -> Winecfg
I know I'm missing a step here. Please comment if you remember what I forgot.
Reboot system.
Turn off Desk Effects
System->Preferences-> Appearance
Turn off the “special effects”. This is the last tab. Select “None”.
Reboot system.


Recent comments
7 hours 17 min ago
4 weeks 1 day ago
7 weeks 1 day ago
7 weeks 2 days ago
9 weeks 1 day ago
9 weeks 1 day ago
9 weeks 1 day ago
10 weeks 2 days ago
11 weeks 3 days ago
13 weeks 17 hours ago