
12 - Lei Shen

Mehguy — Tue, 04/16/2013 - 08:39
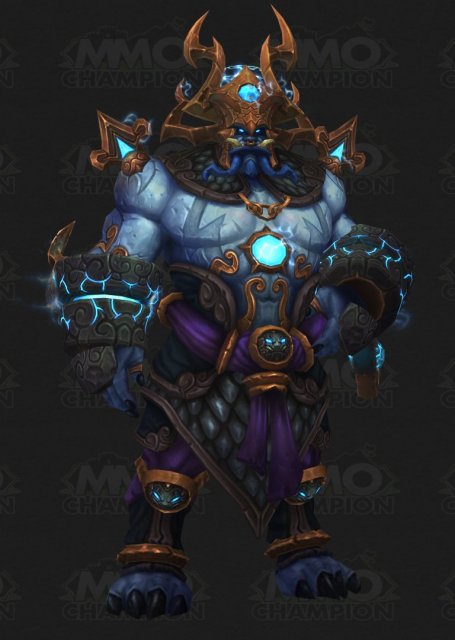
Lei Shen is the final (normal) encounter in Throne of Thunder
He has 329mil health (10-man) and 990mil health (25-man)
Fight recommendations for 10-man are
- 2 Tanks
- 3 Healers
- 5 DPS
This fight is multi-phase and is somewhat complex, in the fact that the room is split into 4 quarters, each quarter gives Lei Shen various abilities.
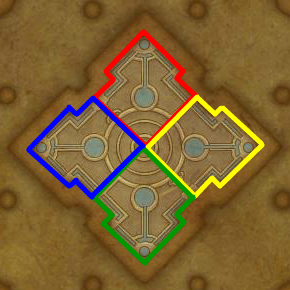
North(red), East(yellow), South(green), West(blue).
During the course of the fight, you will have to drag the boss to the outer corners of the room, at which point he will begin charging Lightning Conduit pillars and gain new abilities. These pillars have 3 levels each, and each level takes 100 energy to reach the next level. With each level that the pillars reach, the abilities that Lei Shen can use from them become more powerful by either targeting more players at once, used more frequently, deal more damage.
North (red) Conduit - Static Shock
- Lei Shen will target a random player (supposedly tanks CANNOT be targetted) with this ability. It will place a 8 yard diameter circle around the target. After 8 seconds will split damage to all players within that 8-yard circle. Raid needs to collapse and stack on tanks/melee.
- For each level the conduit increases, the amount of players targeted by Static Shock increases by 1.
East (yellow) Conduit - Diffusion Chain
- Lei Shen will hit a player with a lightning nature attack which will chain to nearby players and will increase in damage with each jump it makes. In addition, for each player it hits (including the initial target), a "Diffused Lightning" add will spawn. It only melees for a fair amount, and is more annoying than anything, but should still be focused/kill by nearby players. Raid needs to spread 10+ yards apart to prevent lightning chaining and multiple adds spawning at once.
- For each level the conduit increases, the adds that spawn grow more powerful.
South (green) Conduit - Overcharge
- Lei Shen will "Overcharge" a player. That player will grow in size and be rooted in place. After 6 seconds that player will explode creating a expanding ring that grows in size to cover 1/2 the platform stunning those hit by it and dealing moderate/significant damage. HOWEVER, there is a safe-zone on the player affected, so the Raid needs to stack on players affected to prevent damage/stunning.
- For each level the conduit increases, the number of players targeted by Overcharge increases by 1.
West (blue) Conduit - Bouncing Bolt
- Lei Shen creates Bouncing Bolts that target random locations on the ground. These are the blue swirly circles that you see in videos/LFR. These deal moderate damage which is split amongst all players within 6 yards of the impact. If these bolts are not absorbed by players, a "Unharnessed Power" add forms. These are similar to the adds spawned by Diffusion Chain, but are more powerful. ALL Bolts should be absorbed.
- For each level the conduit increases, the number of bolts that Lei Shen summons will increase.
Dumbed Down Version of Pillar abilities
North and South pillars, raid needs to be spread, then stack on players that are selected/affected by the abilities.
East Pillar, spread 10+ yards apart to prevent ability chaining. Nearby players focus add when it spawns.
West Pillar, raid stay spread to cover more ground, when swirly blue circles spawn, should have 2(10-man) or more players stack in them to split damage and prevent add from spawning.
There are "easy" methods that raids recommend, but again, like any raid, each method may be easier or harder for a different group, etc. The trick is to find which is best for you as the fight progresses.
Stage One: Thunderstruck! (lasts until 65%)
Lei Shen
- Discharged Energy - If Lei Shen is not close enough to one of the 4 pillars, he will "discharge" electricity dealing AoE damage to all players every 0.5 sec. Ensure when not moving from one quadrant to another that he is always within range of a pillar.
- Decapitate (Tank concern) - Lei Shen hits the tank, dealing ~350-450k physical damage and increases physical dmg taken by 50% for 30 secs. The damage inflicted by this ability is increased the further the primary target is away from the boss.
- Thunderstruck - Lei Shen throws his axe at a target player/location. Dealing 1+million dmg to anyone in the animation. Outside of the animation, the damage decreases the further you are away from it. Similar to Tortos Rockfalls.
- Crashing Thunder - Calls down thunder on random player, and deals dmg to anyone within 6 yards. Deals 100k+ nature dmg every 1 sec for 45 secs.
Intermission: Supercharge Conduits (occurs at 65% and lasts 45 secs)
- Lei Shen teleports to the middle of the room and becomes invulnerable. He will activate ALL 4 pillars, supercharging them, increasing their levels by 1 AND use their abilities for this phase.
- Raid needs to spread evenly to all 4 quadrants to deal with the abilities.
- For 10-man, the following is recommended
- 2 Tanks
- 1 Healer, 2 DPS
- 1 Healer, 2 DPS
- 1 Healer, 1 DPS (rogue or similar class that can mitigate dmg, or off-heal)
- For 10-man, the following is recommended
- At the end of this phase, the pillar with the highest energy will become exhausted, electrifying that quadrant, dealing damage to any players within it, and preventing Lei Shen from using its abilities.
Stage Two: Lightning Will End You! (lasts until 30%)
Lei Shen - Lei Shen will use a spear instead of his axe and abilities that HE does will alter. Pillar abilties will be the same but more powerful as they were leveled up during the intermission phase.
- Discharged Energy - same as above
- Fusion Slash (Tank Concern) - Replaces Decapitate, slashes the tank, deals HIGH nature damage, knocks them back and increases dmg taken from future Fusion Slashes for 1 min. Requires tank swapping and facing the boss along the edge of the platform so they dont get knocked off.
- Summon Ball Lightning - Suummons balls of lightning at player locations, dealing ~100k dmg to all players withing 6 yards. RAID MUST BE SPREAD WHEN THIS IS CAST.
- After the initial spawn, the balls will periodically rush towards
other players dealing ~70k nature dmg to them. Once the initial
spawn/AoE dmg occurs, raid must quickly stack so balls arent jumping
everywhere and cleave/splash/AoE the balls down, then spread back out.
- After the initial spawn, the balls will periodically rush towards
- Lightning Whip - forms a dark conal cloud from his body at a random location, after a few
seconds will hit that location with a whip, dealing 750k+ nature dmg to
all players at that location. completley avoidable.- Lightning Bolt - The lightning lines on the ground deal
40k nature dmg every 0.25 secs to anyone in them. HOWEVER, if you need
to move, you CAN jump over each individual "bolt"/line and avoid the
damage.
- Lightning Bolt - The lightning lines on the ground deal
Intermission: Supercharge Conduits (30%, lasts 45 seconds)
This is the same as before, except you have one less quadrant to have to cover since it is "exahusted".
For 10-man recommendation is
- 2 Tanks, 1 healer
- 3 DPS, 1 healer
- 2 DPS (one who can help off-heal), 1 healer
Ensure to absorb all bouncing bolts to prevent add spawning, and stack appropriately for Overcharge and Static Shock.
Stage Three: Master of Thunder and Lightning
Heroism and nuke boss.
Lei Shen - Equips both his axe and polearm
- Overwhelming Power - Casts at the beginning of the last phase. Destroys and absorbs the energy from the remaining conduits, preventing their abilities from being used. Overwhelming Power also causes the bosses melee attacks to deal nature dmg every 1 second for 8 seconds.
- Violent Gale Winds - Opens a random wall in his chamber, causing winds to deal pushback (think Get Away from Lei Shi), dealing 15k nature dmg every 1 sec. This will stack and preventing stacks is UN-avoidable. The stacks will gradually make it harder to run against the wind and increase the damage taken by the wind.
Since Lei Shen has both his Axe AND Polearm, he will use all his previous boss abilities from the first 2 Stages
- Thunderstruck - deals 1mil+ nature dmg to players in the animation, decreases in dmg the further away you are from animation. Pay attention to your location and the quickest way to run away during Gale Winds
- Ball Lightning - Again, stay spread for initial cast, then stack as best as possible to cleave/spash/AoE them down, then spread back out.
- Lightning Whip - Pay attention to dark cloud and get out, avoid that area as Gale Winds will likely push you into the lines.
The main strategy behind the fight, is to figure out which pillar is going to be the most damaging to your raid DURING the intermission phases as you have lesser people in the area to help each other deal with them.
Most raids recommend the East platform first for the Diffusion Chain ability. It is recommended to get that pillar to overload first after the first intermission. That way it wont be heavily overcharged when the next intermission comes and you have high powered adds beating your ass.
Recommendation should be as follows.
1- Stage One, start on east pillar, get the charge on the pillar to 90 and move boss quickly to south pillar, get stacks to 80, then continue clockwise to the west, then to north. DO NOT let the stacks on the other pillars get above the 90 that are on the east quadrant.
2- 1st intermission, properly split groups and survive. You WILL have adds during the first intermission due to Diffusion Chain, but as long as the east pillar gets overloaded, then you SHOULDN'T have adds for the remainder of the fight if executed properly.
3- Start of Stage Two, start on south pillar and get to 85-90, move west 85-90, and just stay on north until you get 30% and transition. One of the pillars is GOING to get overloaded on this part regardless, and supposedly the north is the least threatening ability to get higher levels for the 2nd intermission phase. Stay spread for bouncing ball initial cast, then stack after they spawn and AoE them down, spread back out. Avoid lighting whip area. Tanks face the boss towards the platform so you dont get knocked off edge.
4- 2nd intermission, split groups appropriately into remaining 3 quadrants, stack and spread when appropriate, absorb ALL bolts on ground so no adds spawn.
5- Stage Three tank boss in the "middle" of the 2 remaining sections to allow for most movement and pushback for the winds. Blow Heroism and nuke boss fast. Stay spread for the bouncing balls to prevent initial AoE splash dmg on raid, then stack to AoE them down. Stay spread and avoid the Thunderstruck area, avoid Lightning Whip. DO NOT get pushed off edge by gale wind. Should save healer/raid CDs for later in the last phase.
Please reference the following videos for encounter details.


Here's what's challenging
Scaron — Mon, 05/13/2013 - 17:12Here's what's challenging about this fight: Transitions. That's it.
Stay spread for diffusion chain on transition (and actually always) or you'll wipe. Second transition is also challenging, you'll need to plan on how to use healing and damage reduction CDs to survive through the static shock. Main phases are laughably easy.
Be vocal about who is going to soak which bouncing ball.
Other than that, enjoy the loot.
Lei Shen updated - PMS READ ME
Mehguy — Sat, 05/11/2013 - 12:47Lei Shen updated - PMS READ ME
Very nice, well done! Cant
Plum — Sun, 05/12/2013 - 05:31Very nice, well done! Cant wait for the fight.