
04 The Crucible - Warlord Blackhand

Mehguy — Sun, 08/24/2014 - 14:33
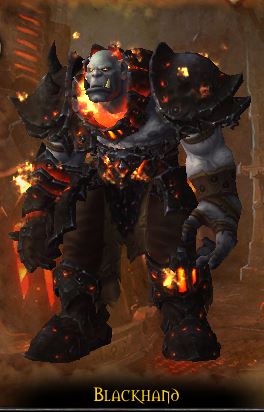
Warlord Blackhand is the final encounter in the Blackrock Foundry raid.
This encounter is a 3-phase fight, with transitions at 70% and 30% At first, there seems like a lot going on in the fight, but in general its very straightforward. It just requires more individual responsibility by all players, primarily in Phase 2, to handle the mechanics of the fight.
For a more detailed view of his abilities or loot, please view the in-game dungeon journal or click HERE to view at WoWHEAD.
Abilities/Overview
Phase 1
- Molten Slag (room mechanic) - The outside edge of the room begins to heat up causing the floor to become molten. This will gradually grow in size towards the middle of the room, eventually forcing you to the very middle of the room.
- Demolition - Throws his hammer at the ceiling, causing it to crash to the ground (noted by swirling brown circles), dealing mild phys dmg to players within 12 yards.
- Massive Demolition - this occurs during regular Demolition, this is just a larger orange circle that deals heavy damage to those nearby and leaves behind a pile of Debris (more on that below). Damage is decreased the farther you are from imact.
- Marked for Death - 2 random players will be marked and have a 30% run speed increase. After 5 seconds, the boss will use Impaling Throw on them. This ability will hit the first "object" it comes into contact with. Marked players need to LoS this behind the Debris piles from the Massive Demolitions. Doing this will also destroy the Debris pile.
- Impaling Throw - Deals moderate damage, ignores all armor and knocks the player back. Also places a 45 sec DoT on the player that ticks every 3 seconds for mild dmg. You can see the path of this from large arrows that appear under the bosses feet.
- Throw Slag Bombs - Throws bombs at random players (typically 3, might be more/less depending on raid size). These will activate after 3 seconds. If detonated, will deal moderate/heavy fire dmg to anyone within 10 yards, and leave a Slagged debuff, increasing dmg taken by 100% for 10 sec. The Molten Slag will also detonate these.
- Shattering Smash (tank mechanic) - deals massive phys dmg split amongst all players within 5 yards, knocks player back, removes all threat and stuns for 3 sec. In Phase 1, tank solo this with a CD, tank swap immediately so melee doesnt die.
Phase 2 (at 70%) - Boss destroys the floor, you fall into room below. Will periodically summon a Siegemaker (seige engine) and Iron Soldiers up on the balcony.
- Marked for Death - Same as above, ditto for Impaling Throw. Marked players need to LoS this ability with the Siegemaker. If there is no Siegemaker up, then use personal or outside CD to mitigate the dmg.
- Throw Slag Bombs - Same as above. However, if the Siegemaker runs over these they will detonate. This needs to be done to help kill it. Be sure to be at least 10 yards from Bombs.
- Shattering Smash - Affects players within 6 yards (as opposed to 5yds in P1). Knocking those affected up to the balcony. NEED to have dps AND a healer in this for this phase. Pay attention to WHERE you stand in the circle on the ground for this ability to see where you will get thrown. The TLDR video below talks about this.
- Siegemaker - These will fixate on random players. The fixated player needs to kite the SM over bombs and be sure to stay in front of it or his Battering Ram will deal moderate dmg to you and knock you back. *RAID AWARENESS* DONT BE IN FRONT OF THIS THING! These also have Blackiron Plating, reducing all dmg taken by 90% per stack. Marked for Death players be sure to LoS the boss with the SM so the Impaling Throw can remove the stacks so the raid can DPS it and the mines can help kill it. If it is not killed fairly quickly, it will begin leaving fire patches all over the ground. Kill quickly.
- Iron Soldiers - These frequently come up on the balcony and spam cast Explosive Round on the raid, dealing mild dmg to anyone within 6 yards of impact. Players knocked up to the balcony by Shattering Smash need to run aroud the balcony interrupt Explosive Round AND kill as many as they can before they need to jump down because of low health.
Phase 3 (at 30%) - Boss destroys the floor AGAIN, and you fall onto a "Crucible" that has been hardened over.
- Overheated (room mechanic) - deals increasing fire dmg over time
- Marked for Death - same as above.
- Impaling Throw - This is now empowered, and will fly THROUGH everyone it its path AND knock you back. Targetted players need to run from group and everyone else dont be between the player and the boss, or behind the player.
- Attach Slag Bombs - Instead of Bombs dropping at targetted locations, they attach to random players. Affected players need to run Bombs off to the side and drop them out of the raid. When the bombs detonate, they will leave a Slag Hole/Crater that will deal heavy dmg to those inside it.
- Slag Eruption - The Slag Craters from the Bombs will erupt, leaving a large dmg-ing area around their location, dealing HEAVY dmg to anyone in them.
- Massive Shattering Smash - Deals MASSIVE fire dmg split to anyone within 6 yards and also leaves a moderate fire DoT that lasts for 10 seconds. ALL players should stack on the tank to split the dmg. This will be a LARGE knockback. This will leave a VERY LARGE Slag Crater in the area. If you are in this large Slag Crater you WILL die. Hence why everyone needs to be in the knockback. By the time you have 4 of these up, you will be out of room and will wipe.
Summary
Like all fights, this is very much about raid awareness.
Phase 1 - Tank the boss on the outer edge of the room, when bombs spawn, kite the boss around the room so players dont trip the bombs. Dodge the Debris falling from the ceiling, especially the large one. Players affected by Marked for Death LoS behind the Debris pile immediately, other raiders be sure not to be between the boss and any Debris piles or you will take the damage. **NOTE - 2 players CAN LoS behind a single Debris pile. You do NOT have to go behind separate ones**. Tanks swap immediately after Shattering Smash so the boss doesnt go after melee or running all over the room. Kill before the room gets filled with Molten Slag.
Phase 2 - Raid be relatively spread so you dont split dmg from the Soldiers on the balcony. Fixated players need to kite the Siegemaker around the room, kiting it over bombs, and do NOT get too close to the front of it. Marked for Death players LoS behind the Siegemaker to remove its armor reduction stacks. Once the stacks are removed, all should focus the Siegemaker and kill it. EVERYONE needs to be aware of where the Siegemaker is so you arent in front of it when its coming by. Kill it before it starts spreading fire all over the ground. Designate a group of players (to include a healer) to be in with melee/MT to get knocked up to the balcony to interrupt/kill the Soldiers.
Phase 3 - Now it becomes a DPS/Healing race. Tanks bring the boss to the edge of the room, ENTIRE raid stacks behind the boss so their backs are towards the middle of the platform. If a player gets Marked for Death run out, NOBODY be behind them or between them and the boss. Players who get Bombs attached to them, run them out so they dont detonate and leave Slag Craters near the raid. Be sure EVERYONE is in the Massive Shattering Smash so they all get knocked back together (or close to it) so they arent in the large Slag Crater and insta-die. Smartly re-position to edge of the room so you dont get knocked back into the large Slag Crater and die. Rinse/repeat until either he dies, or you do.
TLDR
... see below video.


Recent comments
7 hours 17 min ago
4 weeks 1 day ago
7 weeks 1 day ago
7 weeks 2 days ago
9 weeks 1 day ago
9 weeks 1 day ago
9 weeks 1 day ago
10 weeks 2 days ago
11 weeks 3 days ago
13 weeks 17 hours ago